本文同步刊載於 iT 邦幫忙第11屆鐵人賽:[LINE bot 好好玩 30 天玩轉 LINE API] 第 22 天:LINE Notify 實作課!
前言
昨天剛實作了 LINE Notify 就有人問我,第 19 天不是有介紹 LINE Notify,為什麼沒有 LINE Notify 的實作呢?我就說:那個這個 … ,其實我忘記了(´∩ω∩`)
所以今天就來補充之前沒有介紹到的 LINE Notify 實作!
實作 OAuth 2.0
昨天在實作 LINE Login 的時候用了一個套件來加快開發速度,而我們今天要來實作手刻 OAuth2.0 Protocol!來實現 LINE Notify,有的人可能會說這樣會不會很難啊 ~
其實不會的,筆者教大家兩三步就把一個 OAuth 2.0 Protocol 做出來!
修改 app.js
打開原本範例的 app.js,來加入新的路由
const lineNotifyRouter = require('./routes/line-notify');

app.use('/login/line_notify', lineNotifyRouter);
使用者瀏覽
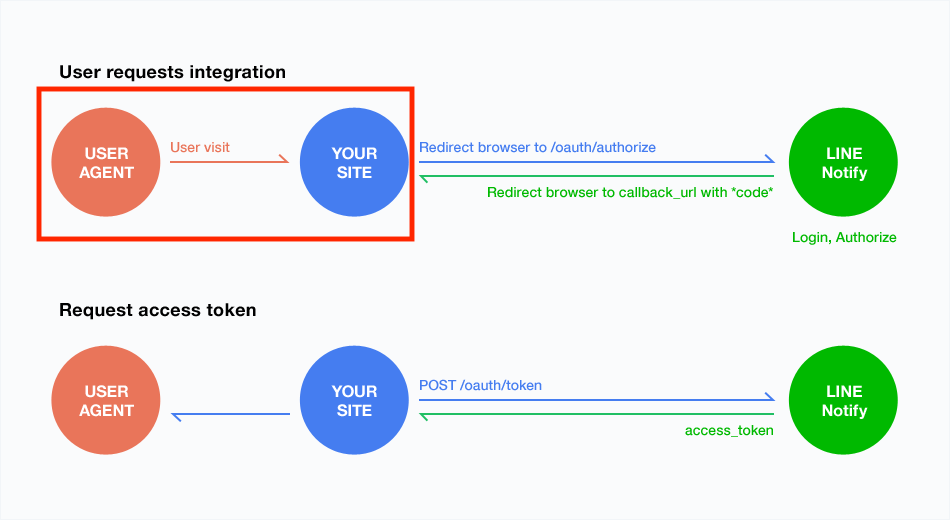
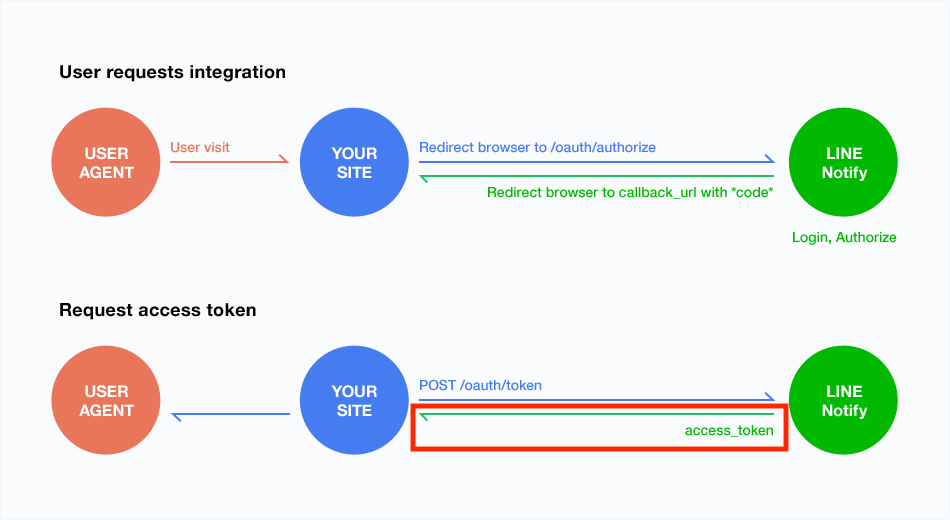
還是記得在第 19 天的時候的這張圖片嗎?我們先來討論一下這張圖片
使用者瀏覽頁面到我們的網站,我們實作一個 API 完成這件事情,打開 routes 在裡面建立一個 line-notify.js 的文件輸入以下
const express = require('express');
const router = express.Router();
const rp = require('request-promise');

router.get('/', function (req, res, next) {
  res.send('http://localhost:3000/login/line_notify');
});

module.exports = router;
這時候把系統開啟在瀏覽器輸入 http://localhost:3000/login/line_notify,會看到 http://localhost:3000/login/line_notify 出現!
我們實作玩這個步驟了
跳轉 Authorize
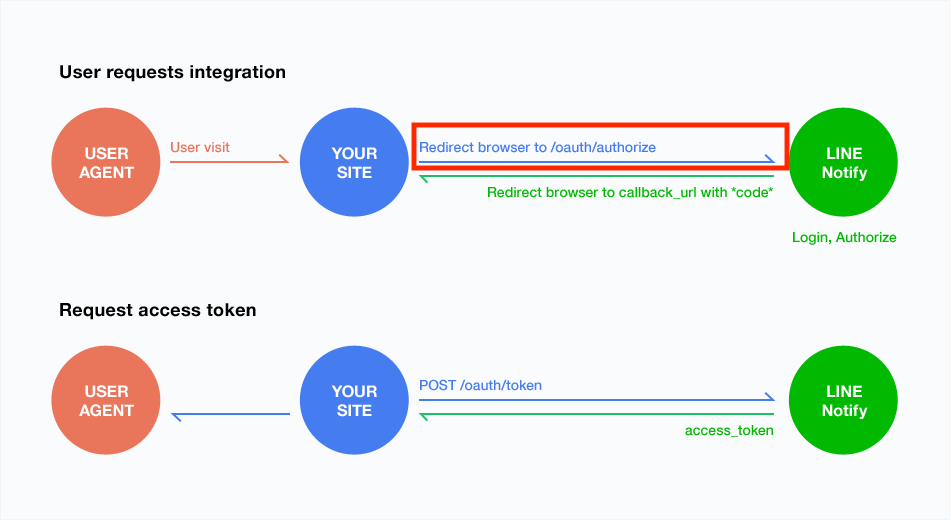
跳轉頁面到 /oauth/authorize
修改一下剛剛的程式碼
router.get('/', function (req, res, next) {
  res.redirect('https://notify-bot.line.me/oauth/authorize');
});
其實這樣子就實作完了,不過我們需要填入需要的參數,所以再修改一下
router.get('/', function (req, res, next) {
  const state = 'state';
  res.redirect(`https://notify-bot.line.me/oauth/authorize?response_type=code&client_id=${process.env['LINE_NOTIFY_CLIENT_ID']}&redirect_uri=${process.env['LINE_NOTIFY_CALLBACK_URL']}&scope=notify&state=${state}`);
});
基本上跟前面幾個實作雷同,我們用環境變數的方法把參數填入進去
這邊需要注意一下是 state 通常拿來做一個驗證或傳遞資訊用,這邊先以文字 state 做範例之後可以拿任何東西來填入他
Callback API
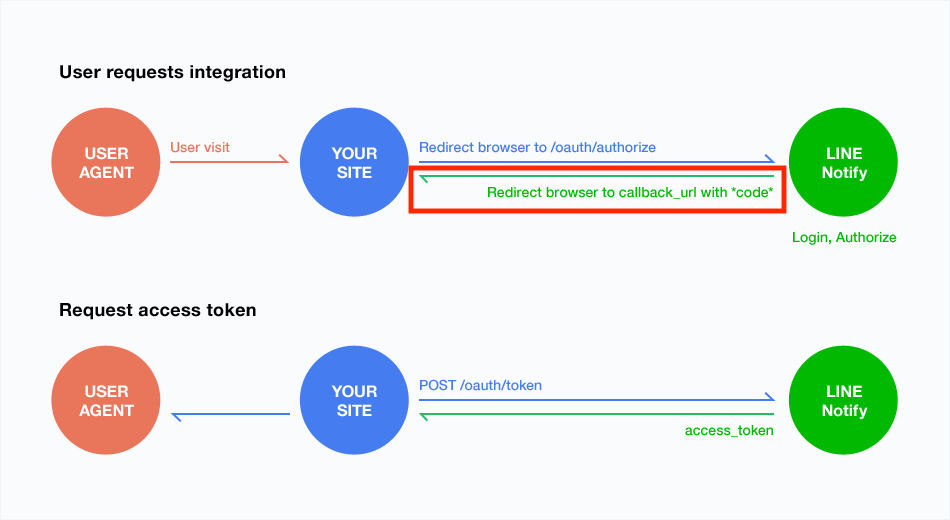
這個部分我們需要寫一個 callback api 來接 LINE API 送過來的 callback,因為 LINE 會用 get 丟過來,所以我們實作一個 callback
router.get('/callback', async function (req, res, next) {

  res.send(req.query);
});
這時候我們再戳一下 https://notify-bot.line.me/oauth/authorize 試試看,會看到如下:
GET /login/line_notify/callback?code=bxJAxZQgzu6KDWN1pRjjjj&state=state 200
觀察一下 Log 會發現,LINE API Server 把 code 與 state 帶回來給我們驗證
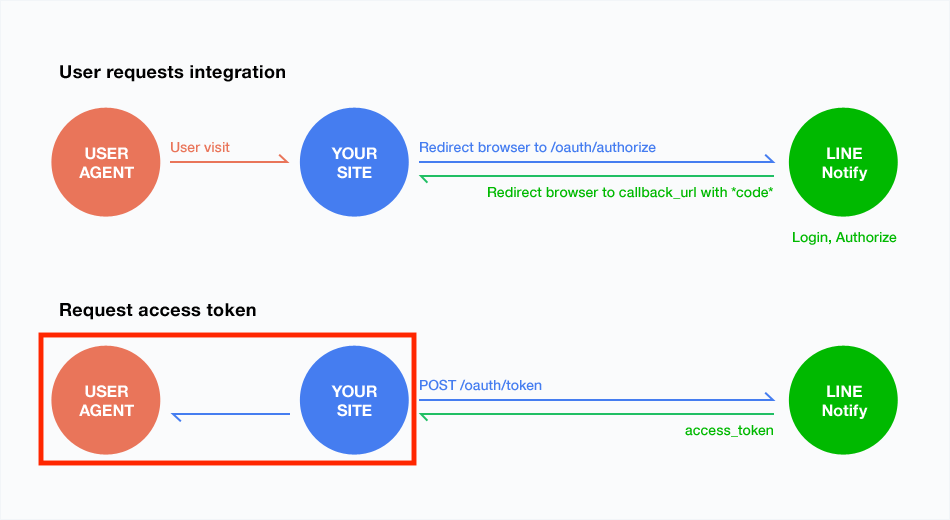
取得 Token
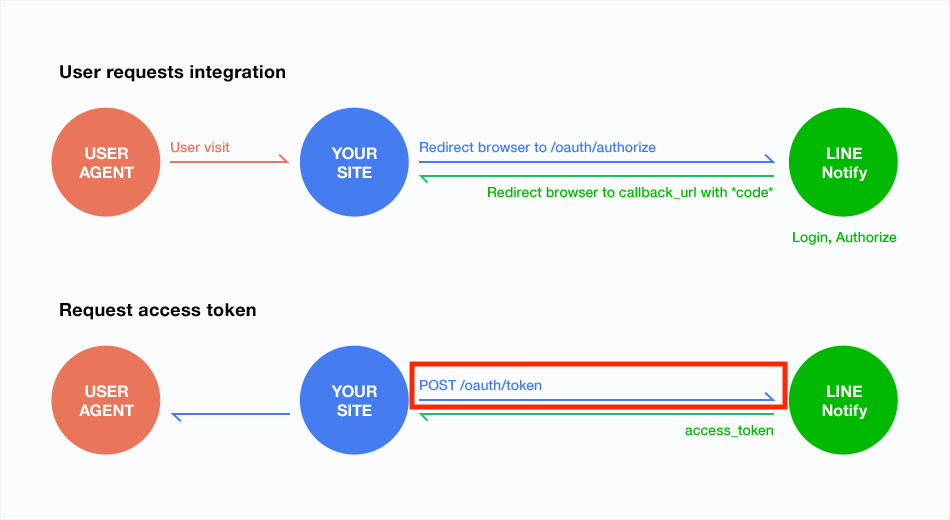
取到了 code 後,要再發送 /oauth/token 給 LINE API
修改一下上面的程式碼
const rp = require('request-promise');

router.get('/callback', async function (req, res, next) {
  const oauthToken = await rp({
    method: 'POST',
    uri: `https://notify-bot.line.me/oauth/token?grant_type=authorization_code&code=${req.query.code}&redirect_uri=${process.env['LINE_NOTIFY_CALLBACK_URL']}&client_id=${process.env['LINE_NOTIFY_CLIENT_ID']}&client_secret=${process.env['LINE_NOTIFY_CLIENT_SECRET']}`,
    json: true
  });

  return res.send(oauthToken);
});
來觀察一下這個程式碼,我們把剛剛收到的 req.qeury.code 放到了 code 的地方,而其他地方繼續用環境變數填入它!
這時候我們再戳一下 https://notify-bot.line.me/oauth/authorize 試試看
{
    status: 200,
    message: "access_token is issued",
    access_token: "IySeaXFUIx8uNYYfyE3ubZ49Rvh16WGscTpzPjCIIII"
}
收到了最終要收到的參數 access_token
有了它之後我們就可以來實作發訊息的動作拉 ~
回傳 Token
這個步驟其實就是上一個小節的 return res.send(oauthToken),其實算是一個相對沒這麼重要的地方,所以就簡單帶過吧 ~
發送 文字訊息的 LINE Notify
今天如果要發送文字訊息可以使用如下,記得要把剛剛拿到的 access_token 放進去 ~
  const notify = await rp({
    method: 'POST',
    url: 'https://notify-api.line.me/api/notify',
    auth: {
      'bearer': "IySeaXFUIx8uNYYfyE3ubZ49Rvh16WGscTpzPjCIIII"
    },
    form: {
      message: '2020 iT邦幫忙鐵人賽'
    },
    json: true
  });
發送 圖片訊息的 LINE Notify
今天如果要發送文字訊息可以使用如下,記得要把剛剛拿到的 access_token 放進去 ~
  const notify = await rp({
    method: 'POST',
    url: 'https://notify-api.line.me/api/notify',
    auth: {
      'bearer': "IySeaXFUIx8uNYYfyE3ubZ49Rvh16WGscTpzPjCIIII"
    },
    form: {
      imageThumbnail: 'https://ithelp.ithome.com.tw/images/ironman/11th/event/kv_event/kv-bg-addfly.png',
      imageFullsize: 'https://ithelp.ithome.com.tw/images/ironman/11th/event/kv_event/kv-bg-addfly.png',
    },
    json: true
  });
發送 貼圖訊息的 LINE Notify
今天如果要發送文字訊息可以使用如下,記得要把剛剛拿到的 access_token 放進去 ~
  const notify = await rp({
    method: 'POST',
    url: 'https://notify-api.line.me/api/notify',
    auth: {
      'bearer': "IySeaXFUIx8uNYYfyE3ubZ49Rvh16WGscTpzPjCIIII"
    },
    form: {
      stickerPackageId: 2,
      stickerId: 150,
    },
    json: true
  });
總結
其實說起來實作一個 OAuth 2.0 並沒有很難對吧! 希望以上訊息有幫助到大家,有任何問題歡迎在下面發問 ヽ(✿゚▽゚)ノ