2020/11/16:GITHUB 重新上架 YOUTUBE-DL 在今天 2020 年 10 月 24 日 […]
新 EC2 T4g Instance – AWS Graviton2 – 免費試用
今天在 AWS 官方 Facebook 的 Service Update 影片看到有新的 Instance type T4g 推出
新機器等級 T4g
看起來是一個主打 ARM 架構的 Instance 目前還沒測試過效能,不過可以嘗試看看有心得再跟大家分享
免費額度
2020 年 9 月 – 2020 年 12 月 31 日所有 AWS 客戶都會自動註冊一個 type t4g.micro 的免費試用版。
延伸閱讀
- https://aws.amazon.com/cn/blogs/china/new-t4g-instances-burstable-performance-powered-by-aws-graviton2/
- https://aws.amazon.com/cn/about-aws/whats-new/2020/09/announcing-new-amazon-ec2-t4g-instances-powered-by-aws-graviton2-processors/
- https://aws.amazon.com/tw/about-aws/whats-new/2020/09/announcing-new-amazon-ec2-t4g-instances-powered-by-aws-graviton2-processors/
Day 30 – 使用 CDK 創建 Open Unlight 遊戲

今天是鐵人賽最後一天,我要來跟大家介紹一個遊戲 Open Unlight 它是一個在 2019 年 7 月 27 日 Open Source 的一個遊戲,剛開源的時候因為沒有安裝說明文件而且有缺少檔案,所以不容易部署在當年的 2019 年 8 月 8 日由 Open Unlight 團隊修改成 legacy-unlight-docker 繼續維護 它應該算是全世界少數 Open Source Server-Client 架構的遊戲之一,Open Source 的遊戲實在是太少了 XD 而為什麼要介紹它呢?因為今天的題目就是教大家用 CDK 把 Unlight 遊戲部署起來呀!
Unlight 遊戲 Server 部署文件
我們今天目標以一台 EC2 在裡面跑 Docker 的架構把整個遊戲伺服器創建起來
建置前我們先看一下 Legacy Unlight Docker (中文) 遊戲專案介紹在文件裡面可以看到遊戲的部署分為 Server 端與 Client 端,而 Server 端有預編譯 Image 可以使用,但是 Client 端沒有需要自己手動編譯,而且 Client 端編譯的時候需要準備字型檔
快速建置指令
而 Open Unlight 其實提供專屬的 UnlightCLI 指令可以幫助快速建立系統,不一定需要用 Legacy Unlight Docker 從 Source Code 編譯
下載指令
指令下載方法
$ gem install unlight-cli
啟動專案
啟動遊戲方法
$ unlight init
導讀完應該就大概知道怎麼把遊戲建立起來了吧!那我們就來寫今天的 CDK 吧!
Unlight 遊戲 CDK
CDK 部分只有寫到 Server 端部署完成,Client 端還是需要進入機器手動編譯的,這點需要注意一下。
建立 Default VPC
今天只有一台 EC2 就直接使用 Default VPC 吧!
const vpc = ec2.Vpc.fromLookup(this, "VPC", {
  isDefault: true,
});
建立 EC2
系統安裝腳本準備
今天建立的 EC2 主要讓 User Data 幫我們把整個環境建立起來並執行遊戲,它會開啟 14 台遊戲主機 1 台資料庫與 1 台 cache 伺服器
更新系統
yum update -y
安裝 vim ruby Nginx
amazon-linux-extras install vim ruby2.4 nginx1 epel -y
安裝 git htop
yum install git htop -y
安裝 docker
amazon-linux-extras install -y docker
下載 docker-compose
curl -L https://github.com/docker/compose/releases/latest/download/docker-compose-$(uname -s)-$(uname -m) -o /usr/local/bin/docker-compose
加入 docker-compose 執行權限
chmod +x /usr/local/bin/docker-compose
啟動 docker
systemctl restart docker
設定開機啟動 docker
systemctl enable docker
設定 ec2-user 使用 docker
usermod -a -G docker ec2-user
安裝 Nginx
amazon-linux-extras install nginx1 -y
啟動 Nginx
systemctl restart nginx
設定開機啟動 Nginx
systemctl enable nginx
下載 unlight-cli
gem install unlight-cli -N --clear-sources --minimal-deps
執行 unlight init 啟動遊戲
unlight init
CDK 建立 EC2
EC2 部分我們把上面討論的 User Data 放進去讓它開機的時候執行,這是因為服務需求比較大我們開的機器等級是 t3a.medium 更小台應該會跑不動
const instance = new ec2.Instance(this, "Instance", {
  vpc,
  instanceType: ec2.InstanceType.of(
    ec2.InstanceClass.T3A,
    ec2.InstanceSize.MEDIUM
  ),
  machineImage: ec2.MachineImage.latestAmazonLinux({
    generation: ec2.AmazonLinuxGeneration.AMAZON_LINUX_2,
  }),
  vpcSubnets: {
    subnetType: ec2.SubnetType.PUBLIC,
  },
  keyName: "KeyPair",
});
instance.userData.addCommands(
  `yum update -y`,
  `amazon-linux-extras install vim ruby2.4 nginx1 epel -y`,
  `yum install tmux git htop -y`,
  `amazon-linux-extras install -y docker`,
  "curl -L https://github.com/docker/compose/releases/latest/download/docker-compose-$(uname -s)-$(uname -m) -o /usr/local/bin/docker-compose",
  `chmod +x /usr/local/bin/docker-compose`,
  `systemctl restart docker`,
  `systemctl enable docker`,
  `usermod -a -G docker ec2-user`,
  `amazon-linux-extras install nginx1 -y`,
  `systemctl restart nginx`,
  `systemctl enable nginx`,
  `gem install unlight-cli -N --clear-sources --minimal-deps`,
  `unlight init`
);
new cdk.CfnOutput(this, "instance", {
  value: instance.instancePublicDnsName,
});
設定防火牆
如果要開設給大家玩記得要把 22 port 保護起來呦!一樣我們為了方便 debug 所以先把 22 port 全開
Unlight 遊戲使用的 Port 為 11000 ~ 13000,相信大家應該不會想用前面幾篇教的方法然後用 for 迴圈跑吧 XD
所以今天說明一個之前沒講過用來控制 Security Group 方法 tcpRange 就可以一行幫我們完成 Port 區段的開設
instance.connections.allowFrom(ec2.Peer.anyIpv4(), ec2.Port.tcp(22));
instance.connections.allowFrom(
  ec2.Peer.anyIpv4(),
  ec2.Port.tcpRange(11000, 13000)
);
以上就是今天的 CDK 教學!就這麼簡單!
Unlight 遊戲 Server 部署測試
寫完後我們就來執行今天的 CDK 吧!cdk deploy 把它執行下去!
查看系統是否有正常跑起來
部署完後我們就可以登入進去輸入 docker ps 看看系統是否有跑起來拉! 如下資訊就可以看到系統是正常執行的情況
- 14 台遊戲主機
- 1 台資料庫
- 1 台 cache 伺服器
       __|  __|_  )
       _|  (     /   Amazon Linux 2 AMI
      ___|\___|___|

https://aws.amazon.com/amazon-linux-2/
[ec2-user@ip-172-31-43-71 ~]$ docker ps
CONTAINER ID        IMAGE                              COMMAND                  CREATED             STATUS              PORTS                      NAMES
ae55da85c62f        openunlight/legacy-server:latest   "server xmlsocket"       4 minutes ago       Up 23 seconds       0.0.0.0:11999->11999/tcp   openunlight_xmlsocket_1
dbd1591f84b9        openunlight/legacy-server:latest   "server raid_rank 12…"   4 minutes ago       Up 23 seconds       0.0.0.0:12070->12070/tcp   openunlight_raid_rank_server_1
5d491c301bcb        openunlight/legacy-server:latest   "server data_lobby 1…"   4 minutes ago       Up 22 seconds       0.0.0.0:12032->12032/tcp   openunlight_data_server_1
92189a119d6e        openunlight/legacy-server:latest   "server lobby 12002"     4 minutes ago       Up 28 seconds       0.0.0.0:12002->12002/tcp   openunlight_lobby_server_1
ca1c6b1795ba        openunlight/legacy-server:latest   "server matching 120…"   4 minutes ago       Up 23 seconds       0.0.0.0:12018->12018/tcp   openunlight_match_server_1
d502e85a13de        openunlight/legacy-server:latest   "server game 12008"      4 minutes ago       Up 22 seconds       0.0.0.0:12008->12008/tcp   openunlight_game_server_1
a615ab3896ae        openunlight/legacy-server:latest   "server global_chat …"   4 minutes ago       Up 27 seconds       0.0.0.0:12020->12020/tcp   openunlight_global_chat_server_1
f1fc99c578dd        openunlight/legacy-server:latest   "server raid_data 12…"   4 minutes ago       Up 31 seconds       0.0.0.0:12100->12100/tcp   openunlight_raid_data_server_1
97eb265c132f        openunlight/legacy-server:latest   "server chat 12012"      4 minutes ago       Up 29 seconds       0.0.0.0:12012->12012/tcp   openunlight_chat_server_1
0d7d7fe736cc        openunlight/legacy-server:latest   "server raid 12050"      4 minutes ago       Up 28 seconds       0.0.0.0:12050->12050/tcp   openunlight_raid_server_1
7bf3e0aeaea9        openunlight/legacy-server:latest   "server raid_chat 12…"   4 minutes ago       Up 21 seconds       0.0.0.0:12090->12090/tcp   openunlight_raid_chat_server_1
7899ae49d6b2        openunlight/legacy-server:latest   "server authenticati…"   4 minutes ago       Up 22 seconds       0.0.0.0:12001->12001/tcp   openunlight_auth_server_1
92c136738e17        openunlight/legacy-server:latest   "server watch 12080"     4 minutes ago       Up 29 seconds       0.0.0.0:12080->12080/tcp   openunlight_watch_server_1
b4fd0bec724b        openunlight/legacy-server:latest   "server quest 12005"     4 minutes ago       Up 28 seconds       0.0.0.0:12005->12005/tcp   openunlight_quest_server_1
58625fbb5e55        mysql:5.7                          "docker-entrypoint.s…"   4 minutes ago       Up 26 seconds       3306/tcp, 33060/tcp        openunlight_db_1
c60470b7c2f3        memcached:1.5.16-alpine            "docker-entrypoint.s…"   5 minutes ago       Up 29 seconds       11211/tcp                  openunlight_memcached_1
部署與編譯 Client
如前面所說因為 Open Unlight 遊戲的 Client 需要依靠資料庫才可以被 build 出來,所以大家需要跟我一起進入機器手動把 Client 端 build 起來
字體檔
字體檔需要大家找一下把它放到 /home/ec2-user/OpenUnlight/fonts 裡面,要準備的字體如:
| 語言 | 必要字體 |
|---|---|
| 繁體中文 | cwming.ttf (cwTeXMing 明體), wt004.ttf (王漢宗特明體), nbr.ttf |
nbr.ttf是一個名為Bradley Gratis的字體,但 Unlight 是有客製化過的。
編譯 Client
準備好字體檔後,就可以來跑 client 建置腳本了,其實只要把字體檔準備好差不多就好了,執行以下指令
$ export ROOT_DIR="/home/ec2-user/OpenUnlight"
$ git clone https://github.com/unlightcpa/Unlight-Images.git OpenUnlight/assets
$ mkdir ${ROOT_DIR}/OpenUnlight/dist
$ mkdir ${ROOT_DIR}/OpenUnlight/fonts

$ docker run --rm -v ${ROOT_DIR}/assets:/assets \
                  -v ${ROOT_DIR}/dist:/app/dist \
                  -v ${ROOT_DIR}/fonts:/app/fonts \
                  -e LANGUAGE=tcn \
                  openunlight/legacy-builder compile-client
結果會出現在 dist 資料夾裡面
$ ls -all OpenUnlight/dist/
total 17136
drwxrwxr-x 2 ec2-user ec2-user       43 Oct 14 17:22 .
drwxrwxr-x 5 ec2-user ec2-user       83 Oct 14 17:11 ..
-rw-r--r-- 1 root     root         1976 Oct 14 17:22 index.html
-rw-r--r-- 1 root     root     17539965 Oct 14 17:22 Unlight.swf
Host Client
有了 Unlight.swf 與 index.html 後就可以把檔案放到我們前面安裝的 Nginx 裡面拉! 它的結構需要如:
dist
├── Unlight.swf
├── index.html
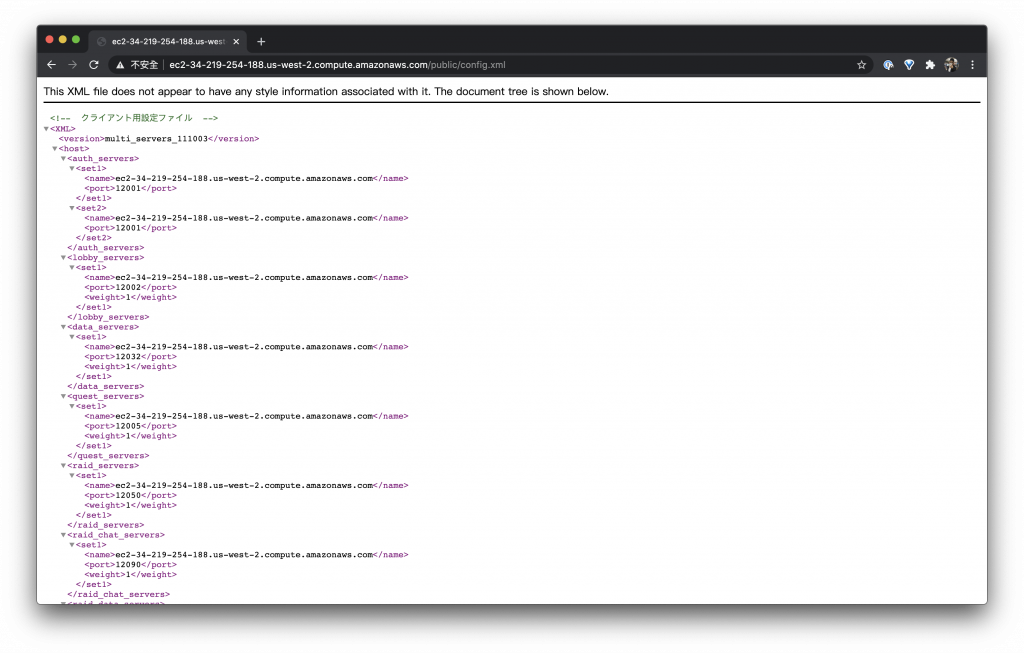
└── public
├── config.xml
├── image/
├── news.xml
└── sound/
- image 與 sound
- 在 OpenUnlight/assets 可以找到它
- config.xml 與 news.xml
- 在 GitHub 找到它
不過其實我有準備好腳本,執行它就可以了!
$ sudo cp /home/ec2-user/OpenUnlight/dist/index.html /home/ec2-user/OpenUnlight/dist/Unlight.swf /usr/share/nginx/html/
$ sudo cp -r /home/ec2-user/OpenUnlight/assets/public /usr/share/nginx/html/
$ sudo wget https://raw.githubusercontent.com/unlightcpa/Unlight/master/app/client/public/news.xml.orig -O /usr/share/nginx/html/news.xml
$ sudo wget https://raw.githubusercontent.com/unlightcpa/Unlight/master/app/client/public/config.xml.orig -O /usr/share/nginx/html/config.xml
在開始前需要記得修改 /usr/share/nginx/html/config.xml 把裡面的 localhost 修改成自己的 EC2 網域或是 IP
小錯誤:架設起來的 index.html 會有一個
swfobject.js找不到雖然不會影響開啟不過如果看到覺得煩可以修改一下到 CloudFlare CDNhttps://cdnjs.cloudflare.com/ajax/libs/swfobject/2.2/swfobject.js
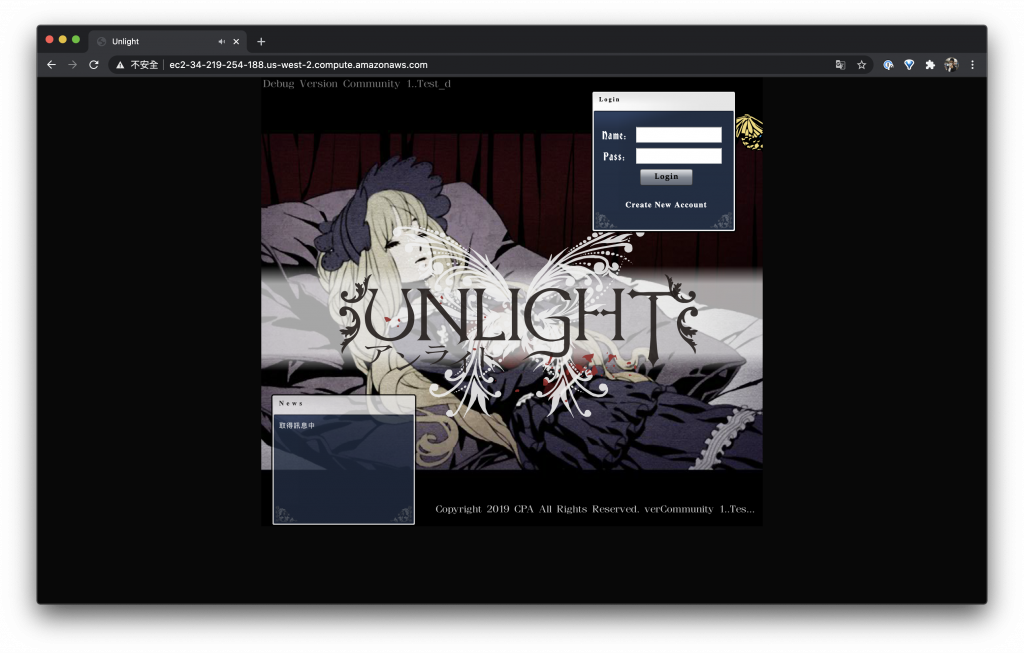
測試遊戲
超興奮的打開網址就可以看到登入介面囉!
趕緊註冊一下遊戲帳號
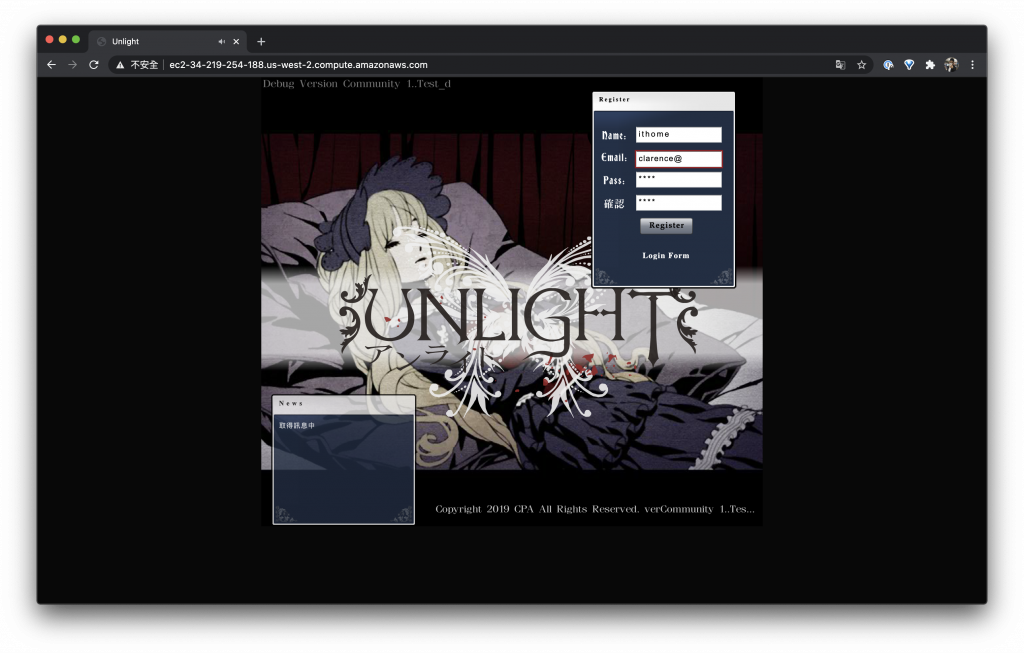
註冊成功,如此就可以確定資料庫串接也是正常的

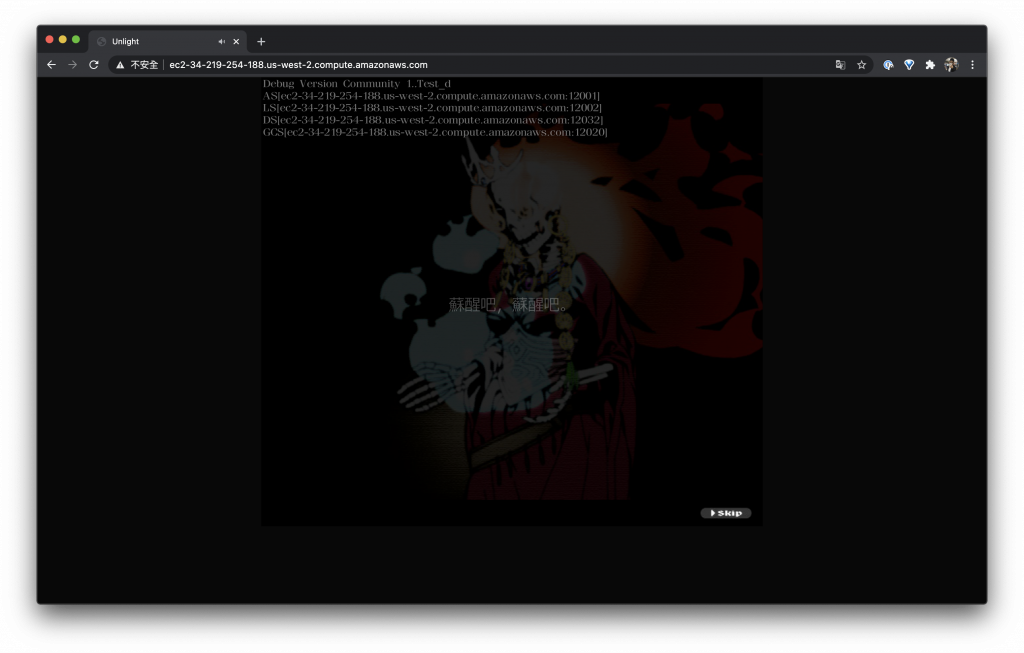
開始玩遊戲吧!(誤
最後
謝謝大家這 30 天的陪伴,不管你是一開始就看我教學文的朋友或是看到分享才進來觀看的朋友,希望這 30 天的教學文對於一個剛學習 AWS CDK 的朋友有幫助,因為我知道中文教學文其實還是一個偏少的一個情況,所以寫中文就是希望讓母語中文的朋友在學習上可以減少阻礙,另外如果大家對我的系列文章有興趣,歡迎大家關注我的部落格謝謝大家拉 ~
架設 WordPress 中健康偵測 (Health Check) 一直失敗的解決方法
在寫鐵人賽的時候想說寫個 CDK WordPress 建置,我把 CDK 寫完在測試的時候發現服務有時候正常有 […]
Day 28 – 使用 CDK 創建 CloudWatch Alarm 的含圖告警同時發送到 LINE 與 Discord
昨天教大家怎麼簡單的在 LINE Notify 上面看到 CloudWatch 的 Alarm,不過這樣只有通知沒有目前的狀態圖對於平常判斷系統是否有問題好像少了什麼,所以今天來教大家怎麼讓 LINE Notify 上面除了可以看到 CloudWatch 的 Alarm 之外還可以看到 CloudWatch Graph
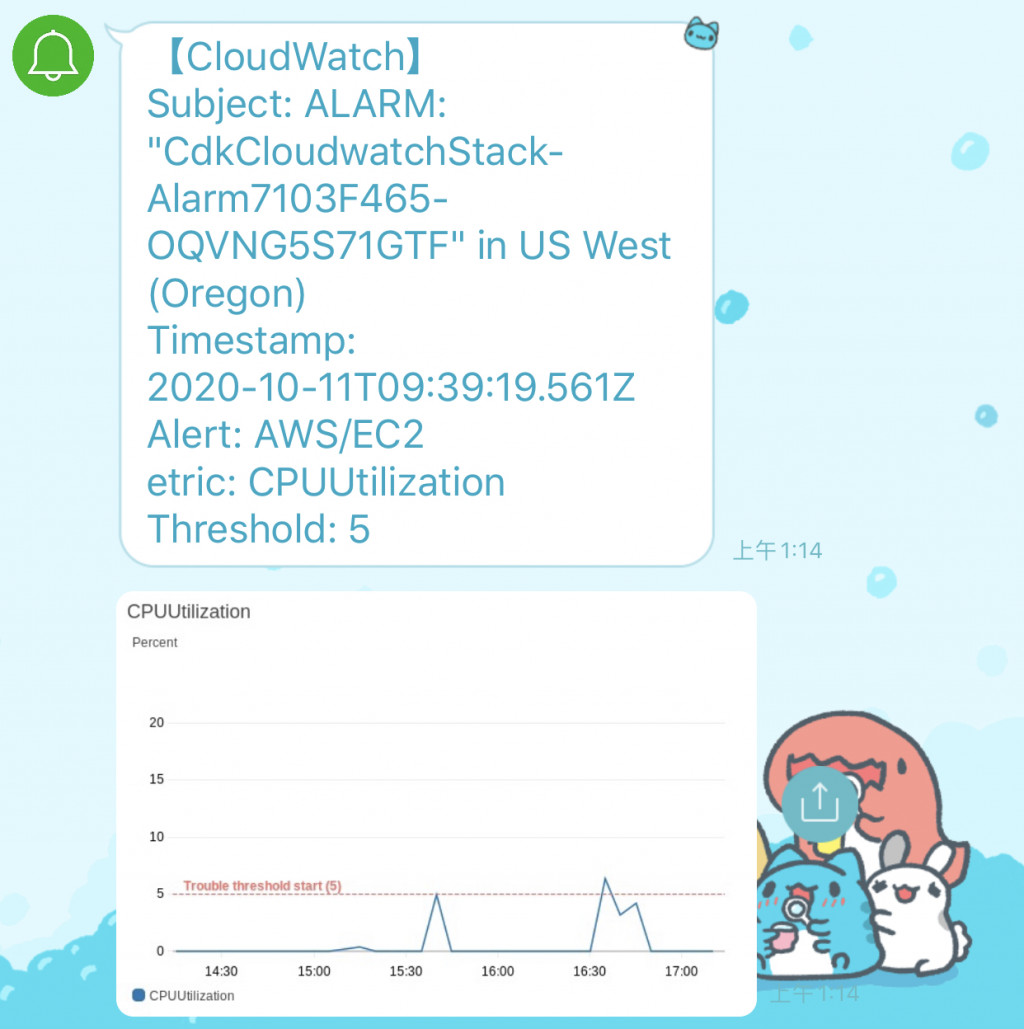
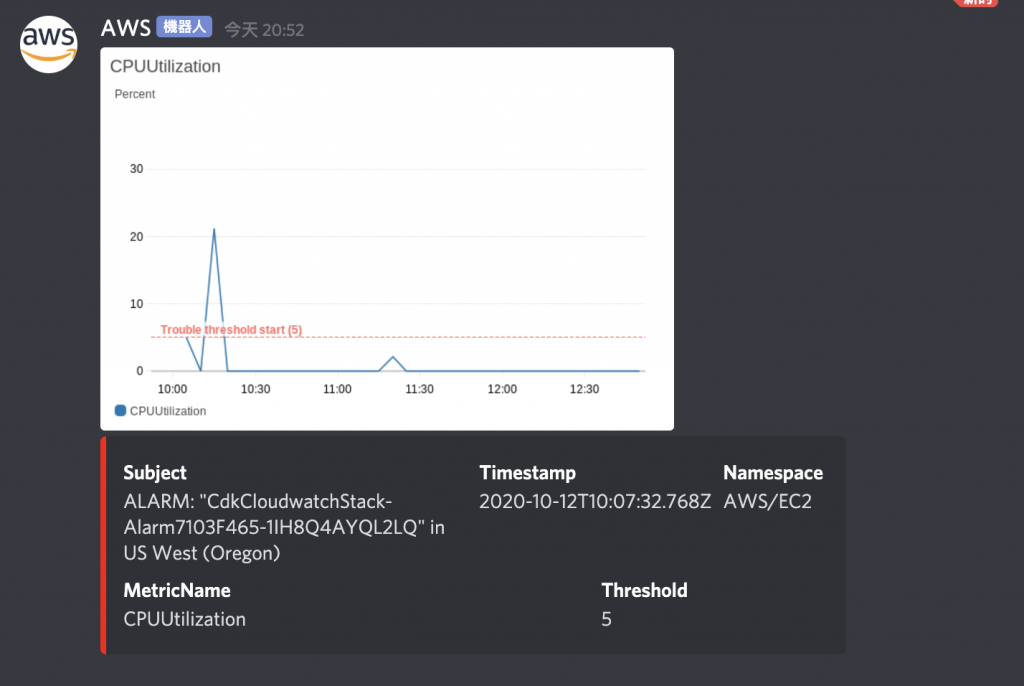
而今天的內容除了可以把訊息發到 LINE Notify 之外還加碼支援把訊息發送到 Discord
今日目標
- 更新 Lambda 程式
- Lambda 加入 Policy
- Lambda 加入 environment
- 加入壓測工具
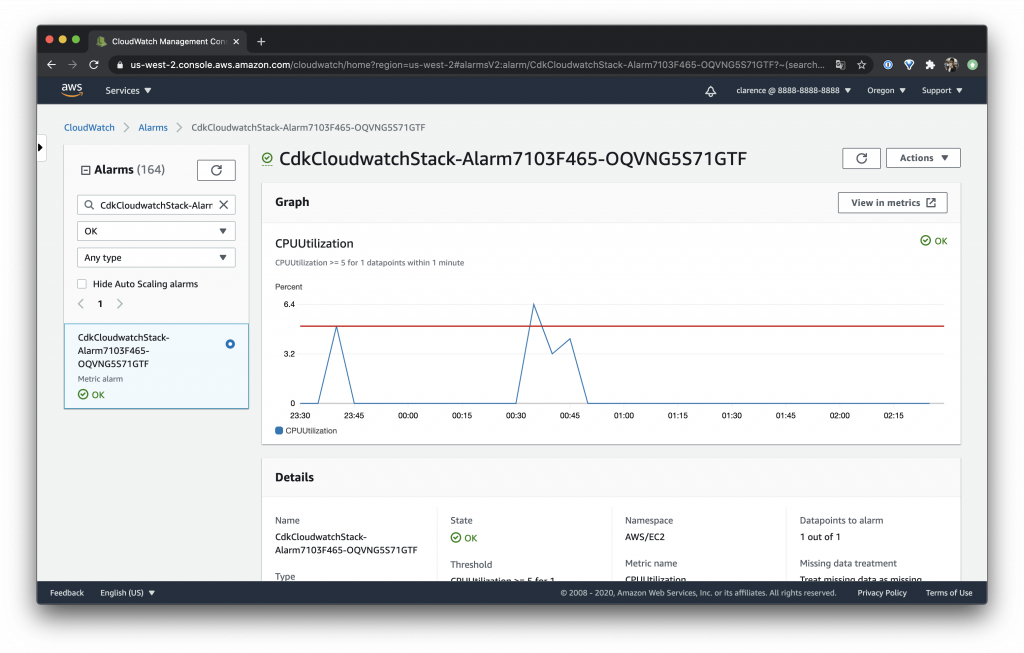
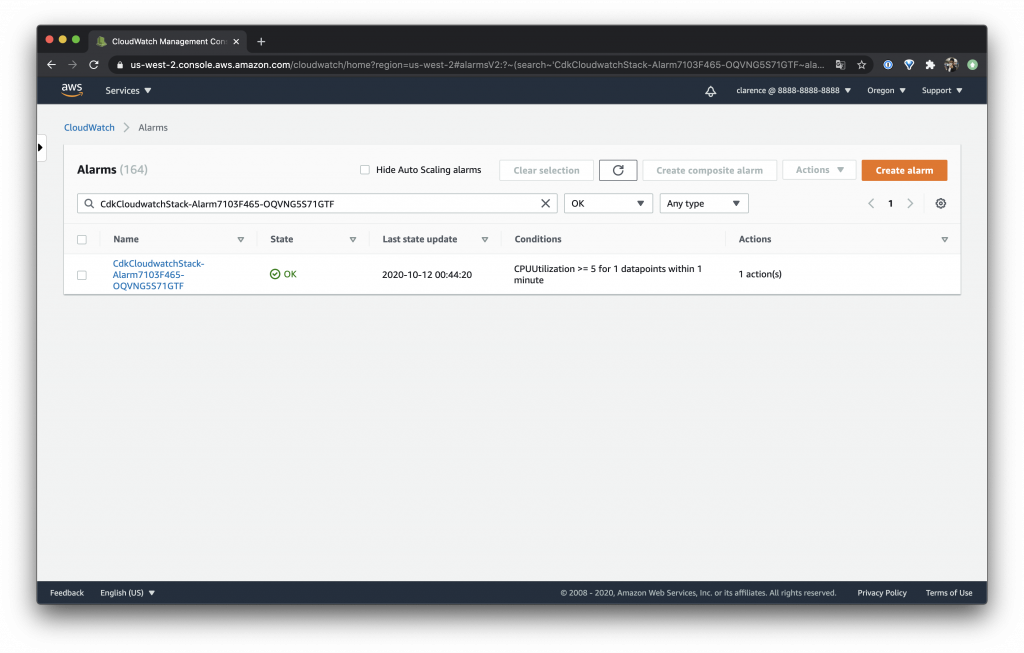
創建一個 CloudWatch Alarm 的含圖告警
更新 Lambda 程式
先更新新版的 Lambda 程式,程式位置 GitHub
主要功能我都已經先寫好並且放到 GitHub 上面了,所以大家只要 pull 就可以取得新版程式了呦!
寫得很爛請大家見諒
$ cd lambda
$ git pull
Lambda 加入 Policy
我們需要讓 Lambda 可以吃到 CloudWatch 的資料,所以要修改一下它的權限,其實這邊權限還可以再給得更小不過今天就先開個 cloudwatch:Get* 吧 XD
myFunction.addToRolePolicy(
  new iam.PolicyStatement({
    actions: ["cloudwatch:Get*"],
    resources: ["*"],
  })
);
Lambda 加入 environment
還記得昨天的範例我們需要直接修改 "your-line-notify-token" 嗎?這個部分我做了一點改變,讓參數直接從 CDK 喂給 Lambda 的 environment
const myFunction = new lambda.Function(this, "Lambda", {
  handler: "index.handler",
  runtime: lambda.Runtime.NODEJS_10_X,
  code: lambda.Code.fromAsset("lambda"),
  environment: {
    LINE_NOTIFY_TOKEN: "your-line-notify-token",
    DISCORD_URL: "your-discord-webhook-url",
  },
});
取得 Discord Webhook 的方法可以參考官方文件
加入壓測工具
昨天的教學因為篇幅關係沒有介紹到如何使用人為方法給予機器負載做測試,今天來把這段補起來
我們平常使用的 AMI 為 AMAZON LINUX 2 所以以此介紹,首先我們需要先安裝 epel 不然我們沒有軟體包可以使用
$ sudo amazon-linux-extras install epel -y
如果對 epel 有問題可以參考 AWS 的文件 How do I enable the EPEL repository for my Amazon EC2 instance running CentOS, RHEL, or Amazon Linux?
安裝 stress-ng
這次我們選用 stress-ng 作為我們的測試工具,還是記得我們前面有教大家使用 User Data 嗎?我們就直接請 User Data 安裝這樣我們開啟系統的時候就可以直接使用了
$ sudo yum install stress-ng -y
製造 CPU Load
我們範例定義的 CPU Utilization threshold 為 5 基本上只要給他一點壓力 CloudWatch Alarm 就會有反應了,所以我們先給予他 CPU 40% 的壓力作為測試給予壓力的指令如:
$ stress-ng -c 1 -l 40
stress-ng: info:  [1084] defaulting to a 86400 second run per stressor
stress-ng: info:  [1084] dispatching hogs: 1 cpu
stress-ng: info:  [1084] successful run completed in 74.43s (1 min, 14.43 secs)
整理一下範例
今天的範例建立了
- EC2
- 放入 Default VPC 加速部署
- 等級 t3a.nano
- Security Group 22 全開
- Image:AMAZON_LINUX_2
- Subnet:PUBLIC
- User Data:
amazon-linux-extras install epel -yyum install stress-ng tmux htop -y
- SNS
- CloudWatch
- Lambda
const vpc = ec2.Vpc.fromLookup(this, "VPC", {
isDefault: true,
});
const securityGroup = new ec2.SecurityGroup(this, "SecurityGroup", {
vpc,
allowAllOutbound: true,
});
securityGroup.addIngressRule(ec2.Peer.anyIpv4(), ec2.Port.tcp(22));
const instance = new ec2.Instance(this, "Instance", {
vpc,
instanceType: ec2.InstanceType.of(
ec2.InstanceClass.T3A,
ec2.InstanceSize.NANO
),
machineImage: ec2.MachineImage.latestAmazonLinux({
generation: ec2.AmazonLinuxGeneration.AMAZON_LINUX_2,
}),
securityGroup,
vpcSubnets: {
subnetType: ec2.SubnetType.PUBLIC,
},
keyName: "KeyPair",
});
instance.userData.addCommands(
`amazon-linux-extras install epel -y`,
`yum install stress-ng tmux htop -y`
);
new cdk.CfnOutput(this, "instance", {
value: instance.instancePublicDnsName,
});
const topic = new sns.Topic(this, "Topic");
const metric = new cloudwatch.Metric({
namespace: "AWS/EC2",
metricName: "CPUUtilization",
dimensions: {
InstanceId: instance.instanceId,
},
period: cdk.Duration.minutes(1),
});
const alarm = new cloudwatch.Alarm(this, "Alarm", {
metric,
threshold: 5,
evaluationPeriods: 1,
});
alarm.addAlarmAction(new cw_actions.SnsAction(topic));
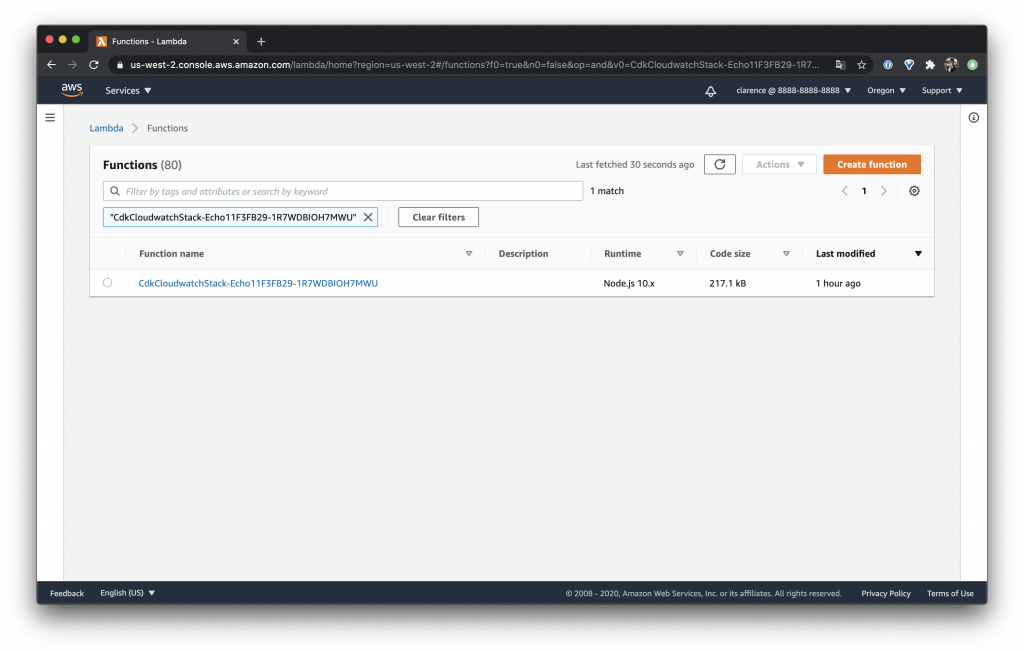
const myFunction = new lambda.Function(this, "Lambda", {
handler: "index.handler",
runtime: lambda.Runtime.NODEJS_10_X,
code: lambda.Code.fromAsset("lambda"),
environment: {
LINE_NOTIFY_TOKEN: "your-line-notify-token",
DISCORD_URL: "your-discord-webhook-url",
},
});
myFunction.addToRolePolicy(
new iam.PolicyStatement({
actions: ["cloudwatch:Get*"],
resources: ["*"],
})
);
topic.addSubscription(new subscriptions.LambdaSubscription(myFunction));
參考資料
- https://github.com/aws-samples/aws-cloudwatch-snapshot-graphs-alert-context
今天介紹如何部署一個 CloudWatch Alarm 的含圖告警,有機會我會在修改目前的程式讓它變得更靈活使用或是支援更多的通訊程式,希望對大家有幫助 ~
Day 27 – 使用 CDK 創建 CloudWatch 也能發送 Alarm 到 LINE 的系統
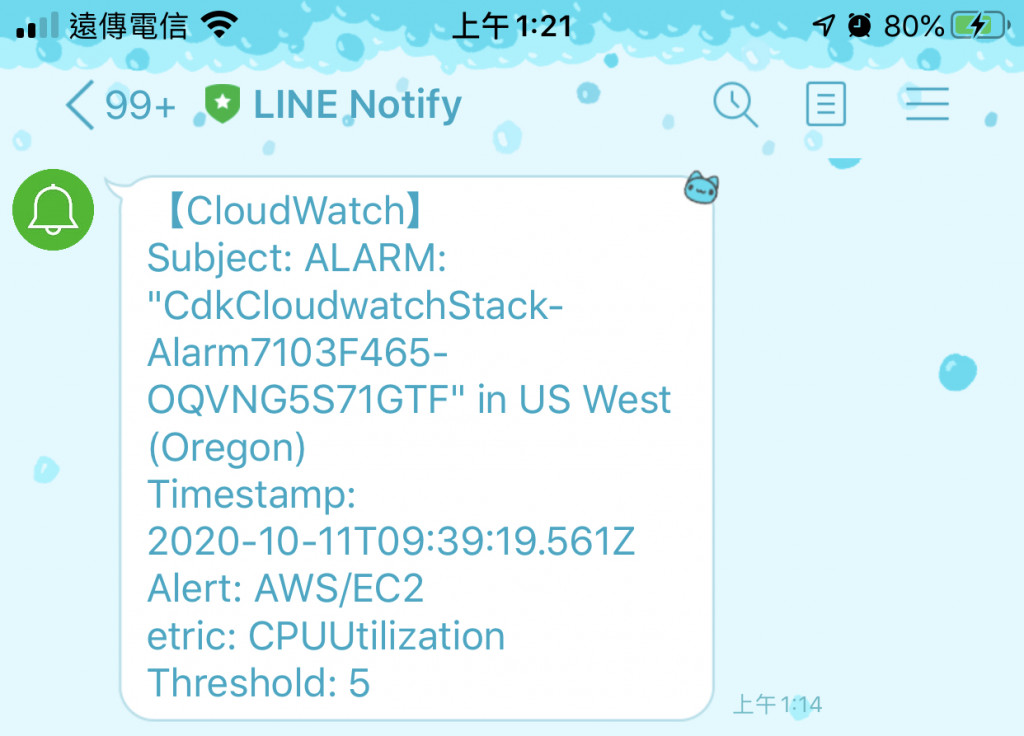
前幾天說了很多建置系統的方法但是對於監控系統沒有太多的說明,今天就來一個 CloudWatch 傳送 Alarm 到 LINE 的教學吧!先給大家看看今天的成品
目標
今天的目標是要模擬我們開的 EC2 發生 CPU Utilization 過高觸發 CloudWatch Alarm 發送告警訊息給 LINE Notify 整個觸發流程是
- EC2 CPU Utilization 過高觸發 CloudWatch Alarm
- CloudWatch Alarm 觸發 SNS Action
- SNS Action 觸發 Lambda
- Lambda 發送 HTTP Request 把訊息帶給 LINE Notify
所以需要創建的服務會有
- EC2
- CloudWatch Alarm
- SNS Action
- Lambda
創建 SNS Topic
我們先創建 SNS
const topic = new sns.Topic(this, "Topic");
創建 Cloudwatch Metric
在創建 Cloudwatch Alarm 之前需要先把資料抓出來,所以先創建一個 Metric,指定我們要抓的資料是 AWS/EC2 以 CPU Utilization 為目標,並且指定 EC2 Instance Id
const metric = new cloudwatch.Metric({
  namespace: "AWS/EC2",
  metricName: "CPUUtilization",
  dimensions: {
    InstanceId: instance.instanceId,
  },
  period: cdk.Duration.minutes(1),
});
創建 Cloudwatch Alarm
準備好 Metric 後就可以把 Alarm 創建起來,範例定義 threshold 為 5
平常比較常用的應該是 85 上下取一個比較能判斷發生問題的值,不過我們為了方便測試以 5 為我們的閾並設定 period 為 1
const alarm = new cloudwatch.Alarm(this, "Alarm", {
  metric,
  threshold: 5,
  evaluationPeriods: 1,
});
串接 Cloudwatch Alarm 與 SNS
設定完之後把 Alarm 與 SNS 連起來
import * as cw_actions from "@aws-cdk/aws-cloudwatch-actions";

alarm.addAlarmAction(new cw_actions.SnsAction(topic));
創建 Lambda 並取得發送 LINE Notify 方法
創建一個 Lambda 這邊我準備好了腳本大家只要把它 Clone 下來就好拉!
Github:https://github.com/clarencetw/sns-alarm.git
$ git clone https://github.com/clarencetw/sns-alarm.git lambda
這邊記得要切換 tag 到 v1.0.0 ,不然會與此篇範例教學不一樣呦!
$ git checkout v1.0.0
還有一個要注意的是要修改 "your-line-notify-token",此參數是 LINE Notify 專用的 Token 取得方法請參考我之前的文章
const myFunction = new lambda.Function(this, "Lambda", {
  handler: "index.handler",
  runtime: lambda.Runtime.NODEJS_10_X,
  code: lambda.Code.fromAsset("lambda"),
});
SNS 訂閱 Lambda
topic 訂閱剛剛創建的 Lambda
topic.addSubscription(new subscriptions.LambdaSubscription(myFunction));
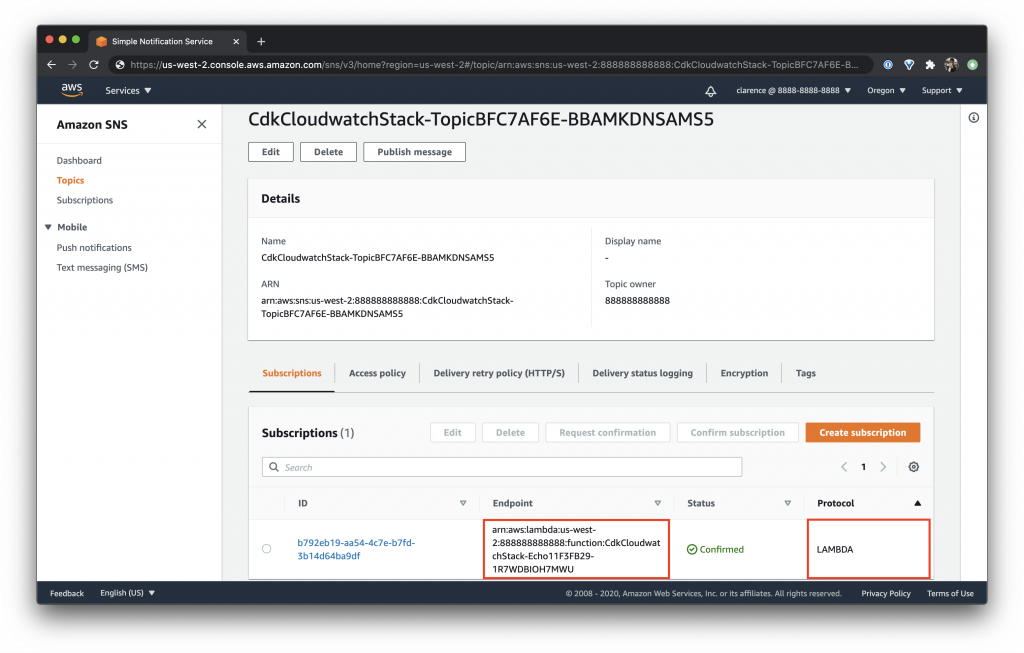
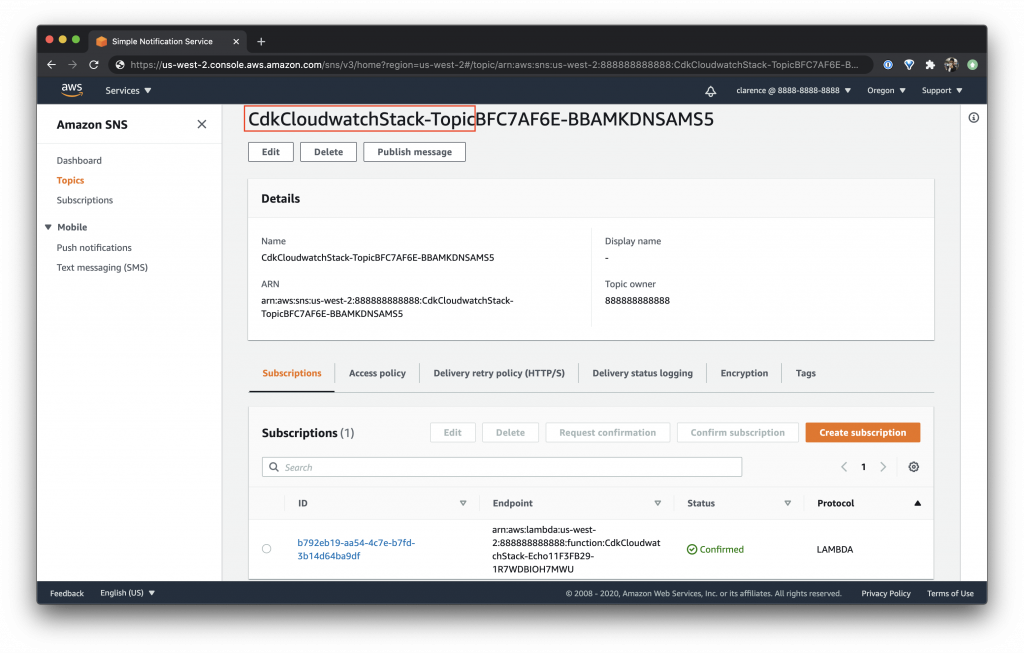
在 SNS 的 Subscriptions 可以看到 Endpoint 為 Lambda
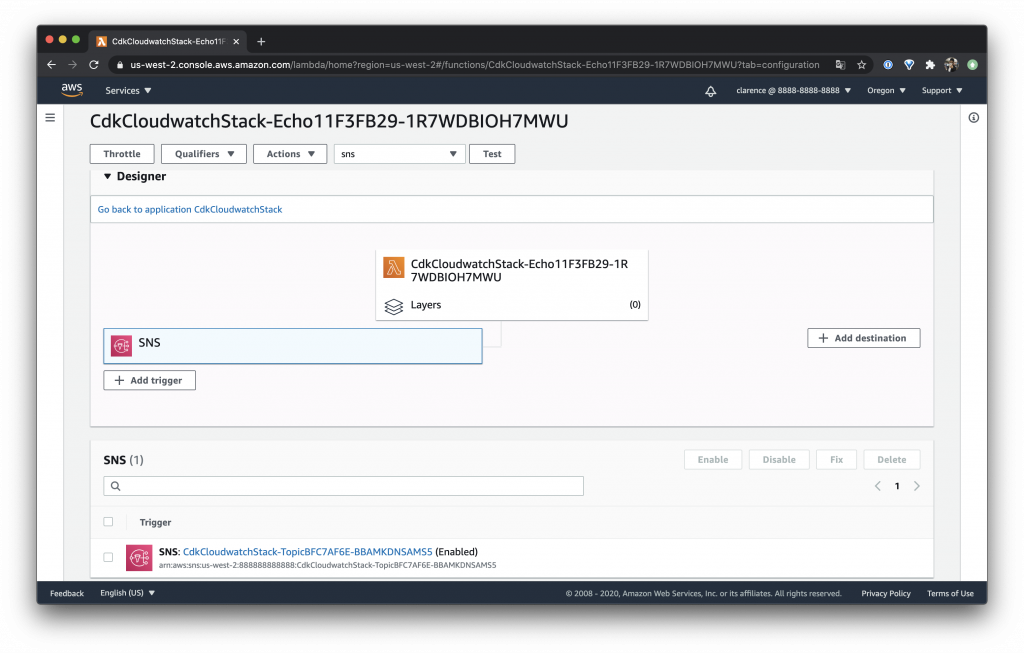
可以在 CloudWatch 看到 SNS 的 Trigger
整理一下
如此就完成一個可以收到 CloudWatch 通知的系統拉!
這邊也跟大家說明一下之前的範例都是每次建立一個 VPC 這樣其實有點久,所以這次就使用 fromLookup 讓它尋找 Default VPC 可以讓整個建置的速度變快
const vpc = ec2.Vpc.fromLookup(this, "VPC", {
  isDefault: true,
});

const securityGroup = new ec2.SecurityGroup(this, "SecurityGroup", {
  vpc,
  allowAllOutbound: true,
});
securityGroup.addIngressRule(ec2.Peer.anyIpv4(), ec2.Port.tcp(22));

const instance = new ec2.Instance(this, "Instance", {
  vpc,
  instanceType: ec2.InstanceType.of(
    ec2.InstanceClass.T3A,
    ec2.InstanceSize.NANO
  ),
  machineImage: ec2.MachineImage.latestAmazonLinux({
    generation: ec2.AmazonLinuxGeneration.AMAZON_LINUX_2,
  }),
  securityGroup,
  vpcSubnets: {
    subnetType: ec2.SubnetType.PUBLIC,
  },
  keyName: "KeyPair",
});

const topic = new sns.Topic(this, "Topic");

const metric = new cloudwatch.Metric({
  namespace: "AWS/EC2",
  metricName: "CPUUtilization",
  dimensions: {
    InstanceId: instance.instanceId,
  },
  period: cdk.Duration.minutes(1),
});

const alarm = new cloudwatch.Alarm(this, "Alarm", {
  metric,
  threshold: 5,
  evaluationPeriods: 1,
});

alarm.addAlarmAction(new cw_actions.SnsAction(topic));

const myFunction = new lambda.Function(this, "Lambda", {
  handler: "index.handler",
  runtime: lambda.Runtime.NODEJS_10_X,
  code: lambda.Code.fromAsset("lambda"),
});

topic.addSubscription(new subscriptions.LambdaSubscription(myFunction));
今天介紹了一個使用 CloudWatch 發送 LINE Notify 的方法,其實網路上應該有滿多文章在教學這段的,不過這次的重點其實在於教大家怎麼使用 CDK 串接 CloudWatch、SNS 與 Lambda!希望對大家有幫助 ~
Day 26 – CDK builds Amazon Elastic Kubernetes Service (EKS)-Service
昨天介紹完了 Cluster 今天來介紹如何使用 CDK 建立 EKS Service 往常我們如果使用 kubectl 要新增服務或是控制都會需要用到 yaml 檔案,但今天我們使用 CDK 部署 EKS 不用使用到 yaml,那我們要怎麼控制 Kubernetes(K8S)呢? 我們用 typescript 寫 CDK 當然就是直接寫 JSON 拉!是不是很神奇呢?快點跟著我看下去吧!

部署目標
在部署前我們先整理一下這次目標需要什麼
- 部署一個服務名稱:hello-kubernetes
- replicas 設定為:3
- Docker Image 使用:paulbouwer/hello-kubernetes:1.5
- Container 內部 port 為:8080
- 設定一個 LoadBalancer 外部 port 為 80 對接內部的 hello-kubernetes 服務
部署 EKS Service
定義 Deployment
整理好後我們先設定 Deployment 以部署 Kubernetes(K8S)的 YAML 來說,我們要處理 Container 名稱、數量、內部 Port
apiVersion: apps/v1
kind: Deployment
metadata:
  name: hello-kubernetes
spec:
  replicas: 3
  selector:
    matchLabels: hello-kubernetes
  template:
    metadata:
      labels: hello-kubernetes
    spec:
      containers:
        - name: hello-kubernetes
          image: 'paulbouwer/hello-kubernetes:1.5'
          ports:
            - containerPort: 8080
但我們說過我們這次的部署不需要 YAML 所以我們直接使用 TypeScript 來寫
const appLabel = { app: "hello-kubernetes" };

const deployment = {
  apiVersion: "apps/v1",
  kind: "Deployment",
  metadata: { name: "hello-kubernetes" },
  spec: {
    replicas: 3,
    selector: { matchLabels: appLabel },
    template: {
      metadata: { labels: appLabel },
      spec: {
        containers: [
          {
            name: "hello-kubernetes",
            image: "paulbouwer/hello-kubernetes:1.5",
            ports: [{ containerPort: 8080 }],
          },
        ],
      },
    },
  },
};
Deployment 部署方法可以參考 kubernetes Documentation
定義 Service
而在部署 Kubernetes(K8S)的 Service YAML,需要處理 LoadBalancer 外部 port 與內部 Service 的對應
apiVersion: v1
kind: Service
metadata:
  name: hello-kubernetes
spec:
  type: LoadBalancer
  ports:
    - port: 80
      targetPort: 8080
  selector: hello-kubernetes
想好後轉換成 TypeScript 的程式
const service = {
  apiVersion: "v1",
  kind: "Service",
  metadata: { name: "hello-kubernetes" },
  spec: {
    type: "LoadBalancer",
    ports: [{ port: 80, targetPort: 8080 }],
    selector: appLabel,
  },
};
Service 部署方法可以參考 kubernetes Documentation
設定 Manifest
往常使用 Kubernetes(K8S)我們需要使用 kubectl apply -f hello-kubernetes.yaml 而在 CDK 我們可以直接使用 addManifest 塞入 cluster 就做完了!
cluster.addManifest("mypod", service, deployment);
顯示 Load Balancer
在使用 Kubernetes(K8S 需要使用 kubectl get rc,services 取得我們 Service 的位置,那使用 CDK 可以直接讓它在部署的時候用 Output 直接吐出來!從此可以不用再使用 kubectl 拉!ヽ(✿゚▽゚)ノ
new cdk.CfnOutput(this, "LoadBalancer", {
  value: cluster.getServiceLoadBalancerAddress("hello-kubernetes"),
});
測試
說了這麼多我們來部署測試看看吧!雖然上面說我們不需要用到 kubectl 不過我們還是需要用它來進行測試確定系統有沒有如所想的部署執行一下 cdk deploy 等它 15 ~ 30 分鐘吧! ( • ̀ω•́ )
執行完後的 Output:
Outputs:
CdkEksStack.LoadBalancer = aba304eea204b4239abb905439ac8ec7-1947016485.us-west-2.elb.amazonaws.com
CdkEksStack.eksConfigCommandDB09280A = aws eks update-kubeconfig --name eksB49B8EA3-7fcd6a64ed934f00ae43ec1cb67a87fa --region us-west-2 --role-arn arn:aws:iam::869989823608:role/CdkEksStack-mastersRole634808EE-1I504Q4EPLS70
CdkEksStack.eksGetTokenCommand8952195F = aws eks get-token --cluster-name eksB49B8EA3-7fcd6a64ed934f00ae43ec1cb67a87fa --region us-west-2 --role-arn arn:aws:iam::869989823608:role/CdkEksStack-mastersRole634808EE-1I504Q4EPLS70
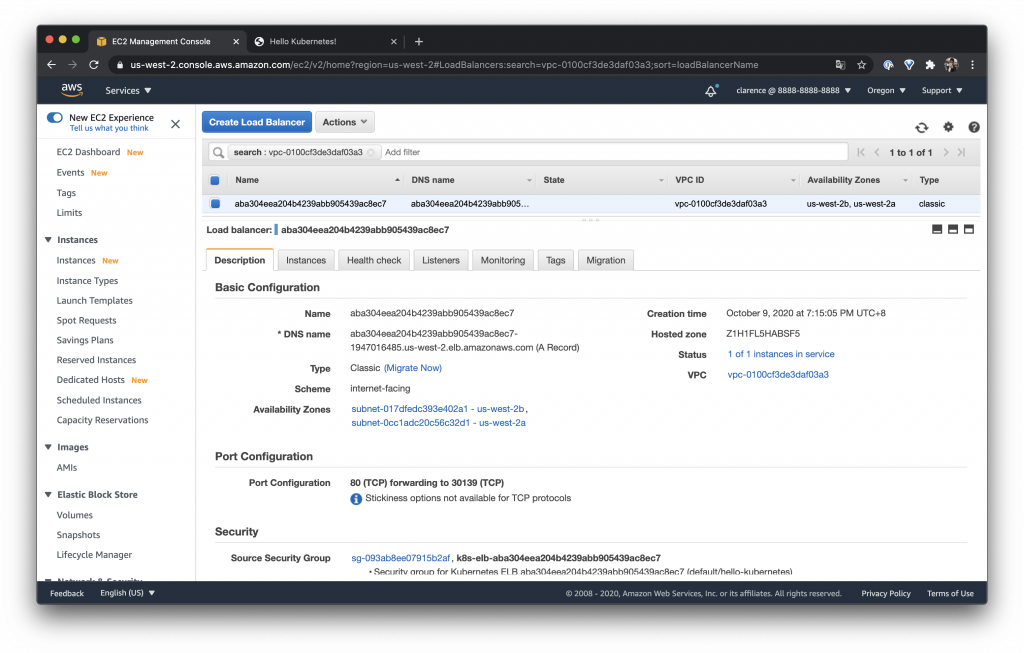
AWS Console 的 Load balancer
可以看到在 AWS Load balancer 建立了一個 classic 的服務而他的 DNS 如上面的 CDK Output
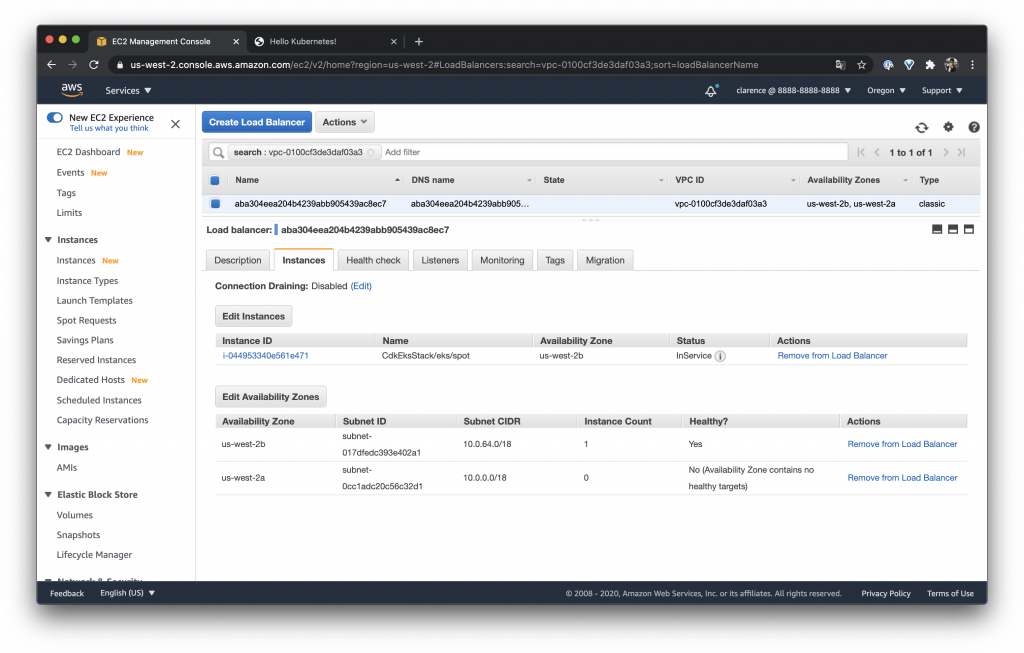
而在 Instances 可以看到我們的 Cluster 機器確實註冊在這個 Load balancer 後面
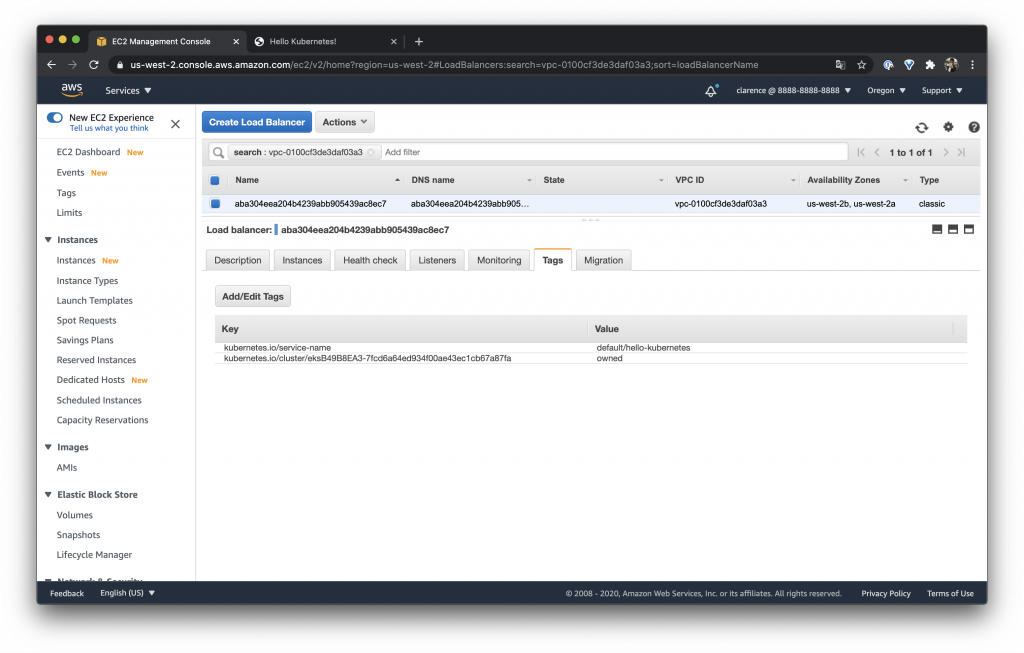
Tags 可以看到有些設定被定義
查看 Kubernetes replicas 數量
可以使用 kubectl get pods 看到我們的 replicas 確實有設定為 3
$ kubectl get pods
NAME                                READY   STATUS    RESTARTS   AGE
hello-kubernetes-5655b546f8-cm66l   1/1     Running   0          49m
hello-kubernetes-5655b546f8-l8xkj   1/1     Running   0          49m
hello-kubernetes-5655b546f8-msjh6   1/1     Running   0          49m
mypod                               1/1     Running   0          97m
查看 Kubernetes Services 的部署狀態
使用 kubectl get rc,services 查看我們的 Load Balancer 確實也與 AWS Console 顯示的一樣
$ kubectl get rc,services
NAME                       TYPE           CLUSTER-IP      EXTERNAL-IP                                                               PORT(S)        AGE
service/hello-kubernetes   LoadBalancer   172.20.200.52   aba304eea204b4239abb905439ac8ec7-1947016485.us-west-2.elb.amazonaws.com   80:30139/TCP   35m
service/kubernetes         ClusterIP      172.20.0.1      <none>                                                                    443/TCP        3h35m
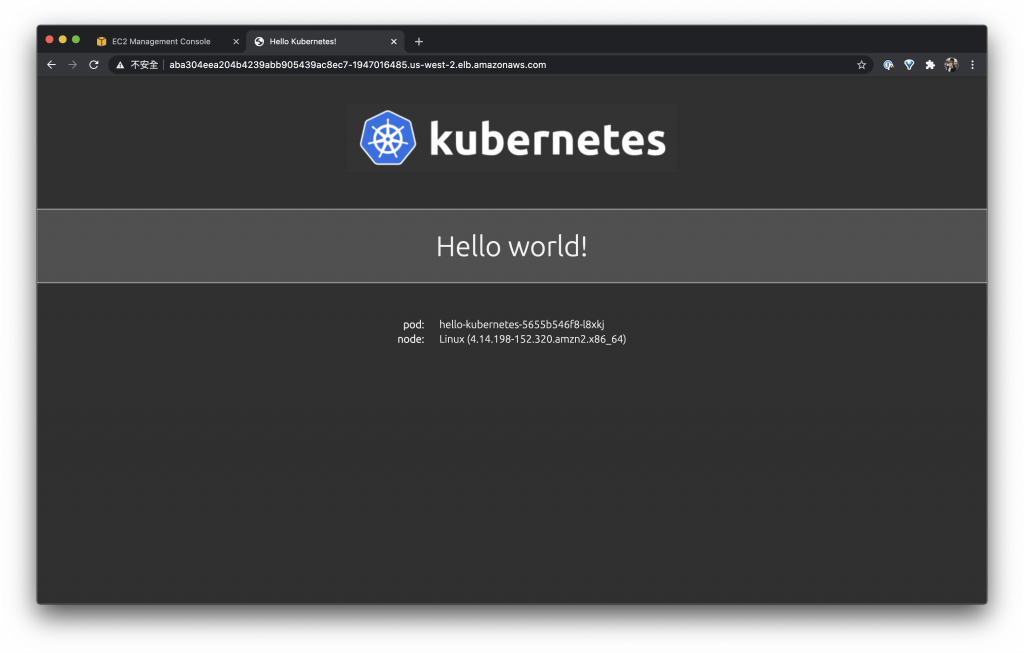
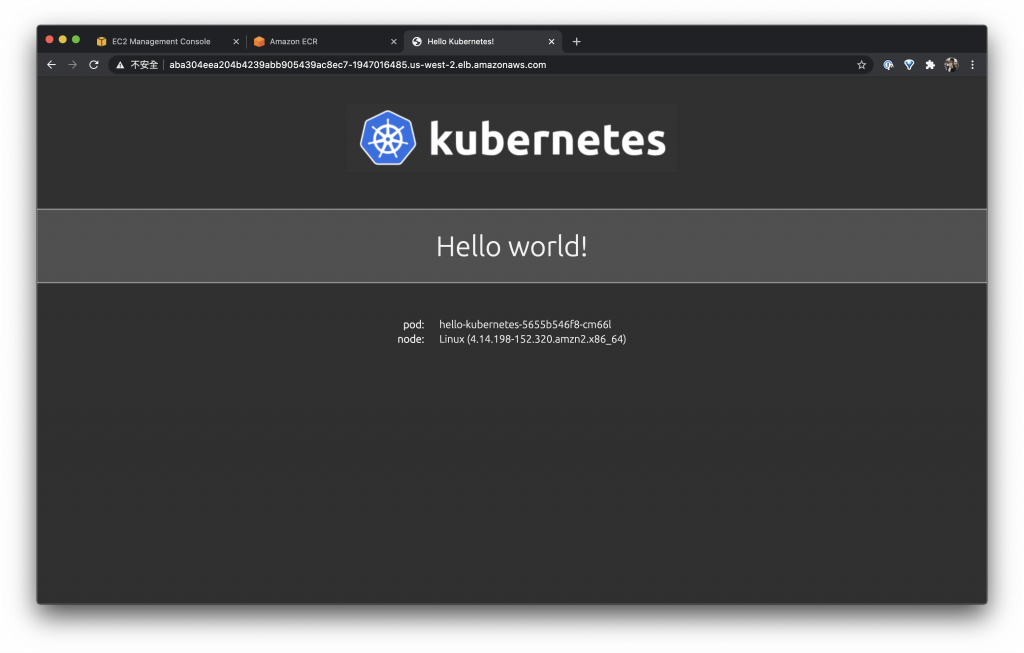
瀏覽一下 Kubernetes 部署的網頁
瀏覽一下剛剛部署的 LoadBalancer 可以看到我們的 pod id 每次都不一樣,如剛剛部署的 replicas 數量會有三個輪流吃到我們的 request

查看 pod log
雖然我們這邊主要不是介紹 Kubernetes 不過順便提一下如果想要看到 pod 的 log 可以使用 kubectl logs 帶上 id 查看 Log
$ kubectl logs hello-kubernetes-5655b546f8-cm66l
npm info it worked if it ends with ok
npm info using [email protected]
npm info using [email protected]
npm info lifecycle [email protected]~prestart: [email protected]
npm info lifecycle [email protected]~start: [email protected]

> [email protected] start /usr/src/app
> node server.js

Listening on: http://hello-kubernetes-5655b546f8-cm66l:8080
::ffff:10.0.255.11 - - [09/Oct/2020:11:17:29 +0000] "GET / HTTP/1.1" 200 667 "-" "curl/7.64.1"
::ffff:10.0.255.11 - - [09/Oct/2020:11:17:40 +0000] "GET /favicon.ico HTTP/1.1" 404 150 "http://aba304eea204b4239abb905439ac8ec7-1947016485.us-west-2.elb.amazonaws.com/" "Mozilla/5.0 (Macintosh; Intel Mac OS X 10_15_6) AppleWebKit/537.36 (KHTML, like Gecko) Chrome/85.0.4183.121 Safari/537.36"
今天介紹 CDK 可以神奇的處理很多原本要用 kubectl 才可以處理的事情是不是超神奇的啊!!!
Day 25 – CDK 建置 Amazon Elastic Kubernetes Service(EKS)- Cluster
最近談了這麼多的 ECS 來換換口味來個 Amazon Elastic Kubernetes Service 吧!通常我們簡稱它為 Amazon EKS 或是 AWS EKS 後面我們會直接使用 AWS EKS 稱呼它
AWS EKS
發布時間
在一開始我們先來簡單介紹一下 AWS EKS 這個服務,它在 2017/11/29 發布預覽版,還記得那個時候剛發布就去申請了 preview,初期版本滿簡單的而且不能外掛任何的模組
經過了半年多在 2018/06/05 發布了正式版
在一年後 2019/06/03 開始支援 AWS Fargate
在 2020/03/10 也開始更新到 1.15 版
而在 2020/04/30 更新到 Kubernetes 1.16 版
價格
在 2020/01/21 之前的價格是每小時 0.20 USD 發布訊息後由原本的 0.20 USD 降至每小時 0.10 USD 價格降低了 50%,其實這個價格說貴不貴說便宜也不便宜因為自己起一台 AWS c5.large 也需要 0.10 USD 而且還需要自己顧這台 EC2
使用 CDK 建立 AWS EKS
簡單介紹了 AWS EKS 的歷史那我們就來使用 AWS CDK 建立 AWS EKS 吧!
AWS EKS 架構
在說明之前我們先來看一下我們今天要完成的目標架構圖,今天要完成的地方是紅色框框裡面的部分,有 Amazon EKS 本身跟 Kubernetes Cluster 讓它跑在 EC2 上面
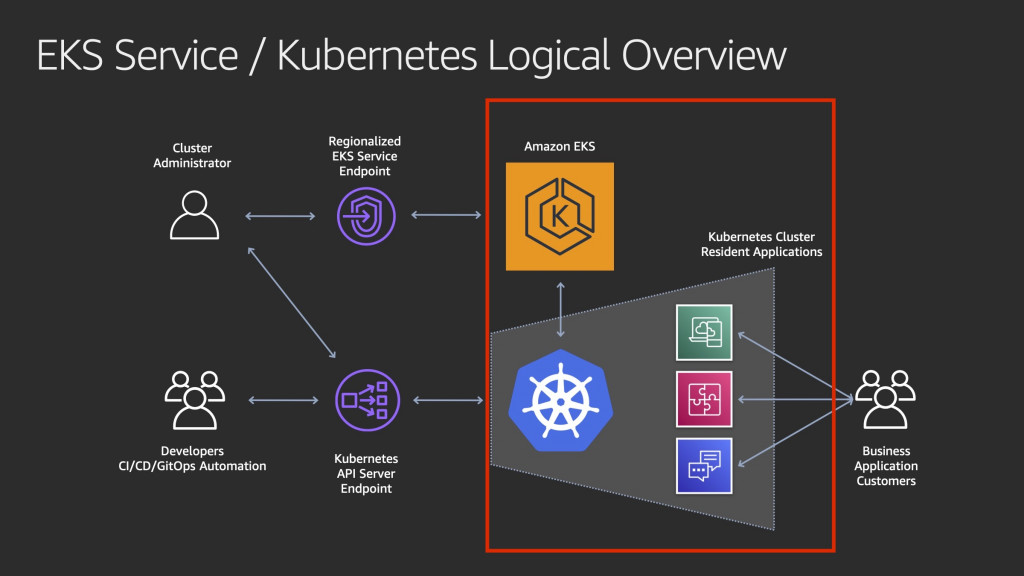
出處 AWS re:Invent 2019: [REPEAT 1] Amazon EKS under the hood (CON421-R1) PPT YouTube
CDK 程式
其實要使用 CDK 建立一個 EKS 非常的簡單只要一行就可以把整個非常龐大的 K8S 啟動
const cluster = new eks.Cluster(this, "eks", {
  version: eks.KubernetesVersion.V1_17,
});
如此配置會在後面創建一個新的 VPC 與兩台 m5.large 的機器
https://docs.aws.amazon.com/cdk/api/latest/docs/aws-eks-readme.html#managed-node-groups
https://docs.aws.amazon.com/cdk/api/latest/docs/aws-eks-readme.html#masters-role
EKS 建立 master role
如此配置 EKS 沒有辦法訪問,所以我們建立一個 Role 它會把 IAM 與 system:masters 進行一個綁定,來修改一下程式
const mastersRole = new iam.Role(this, "mastersRole", {
  assumedBy: new iam.AccountRootPrincipal(),
});

const cluster = new eks.Cluster(this, "eks", {
  version: eks.KubernetesVersion.V1_17,
  mastersRole,
});
修改 spot cluster
我在測試比較喜歡用 spot 的機器畢竟 spot 的機器比較便宜,所以我在這邊先做一些修改加入 spot 的設定,如果之前有看我的 ECS 介紹就會覺得這邊很熟悉我們只要跟 auto scaling group 說明 spot 的 price 就會幫我們啟動一個 spot 的 cluster 了!
這邊要注意原本的 cluster 也會啟動機器所以要把 defaultCapacity 設定為 0 不然會跑出三台呦!
const cluster = new eks.Cluster(this, "eks", {
  version: eks.KubernetesVersion.V1_17,
  defaultCapacity: 0,
  mastersRole,
});

cluster.addAutoScalingGroupCapacity("spot", {
  spotPrice: "0.1094",
  instanceType: new ec2.InstanceType("t3.large"),
});
部署測試
而因為整個架構比較複雜這邊的部署要先有心理準備,大概需要 15 分鐘到 30 分鐘的時間
部署完成後 CDK 很貼心的準備好要怎麼登入 EKS 的指令直接服用就可以了!
Outputs:
CdkEksStack.eksConfigCommandDB09280A = aws eks update-kubeconfig --name eksB49B8EA3-7fcd6a64ed934f00ae43ec1cb67a87fa --region us-west-2 --role-arn arn:aws:iam::888888888888:role/CdkEksStack-mastersRole634808EE-1I504Q4EPLS70
CdkEksStack.eksGetTokenCommand8952195F = aws eks get-token --cluster-name eksB49B8EA3-7fcd6a64ed934f00ae43ec1cb67a87fa --region us-west-2 --role-arn arn:aws:iam::888888888888:role/CdkEksStack-mastersRole634808EE-1I504Q4EPLS70
設定 kubeconfig
$ aws eks update-kubeconfig --name eksB49B8EA3-7fcd6a64ed934f00ae43ec1cb67a87fa --region us-west-2 --role-arn arn:aws:iam::888888888888:role/CdkEksStack-mastersRole634808EE-1I504Q4EPLS70
Added new context arn:aws:eks:us-west-2:888888888888:cluster/eksB49B8EA3-7fcd6a64ed934f00ae43ec1cb67a87fa to /Users/clarence/.kube/config
使用 kubectl
如此執行完我們就可以使用 kubectl 指令拉!執行 get node 可以看到我們有一台機器受 EKS 管理
$ kubectl get node
NAME                                        STATUS   ROLES    AGE   VERSION
ip-10-0-255-11.us-west-2.compute.internal   Ready    <none>   14m   v1.17.11-eks-cfdc40
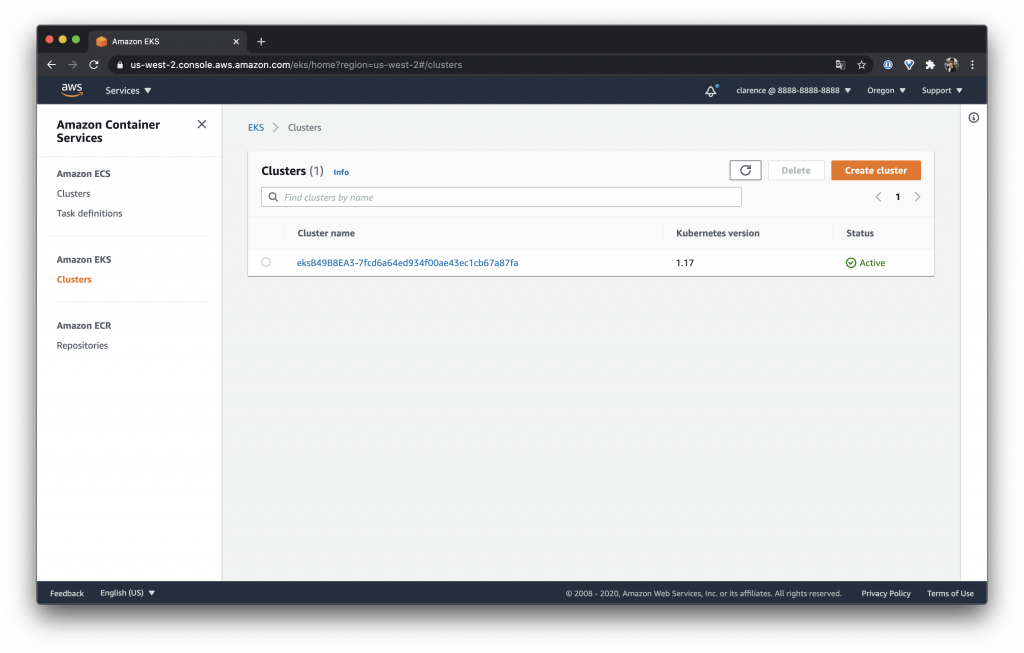
AWS EKS Console
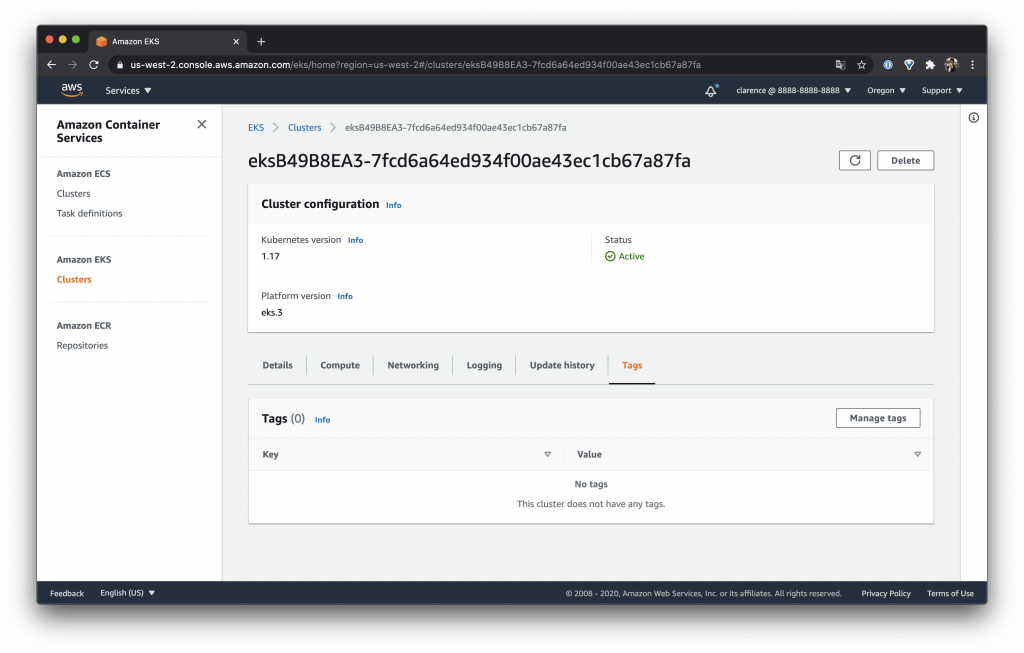
我們先到 AWS Console 看看 Clusters 出現了我剛剛創建的 EKS Cluster
也可以在 EC2 看到唯一的一台 EC2 機器
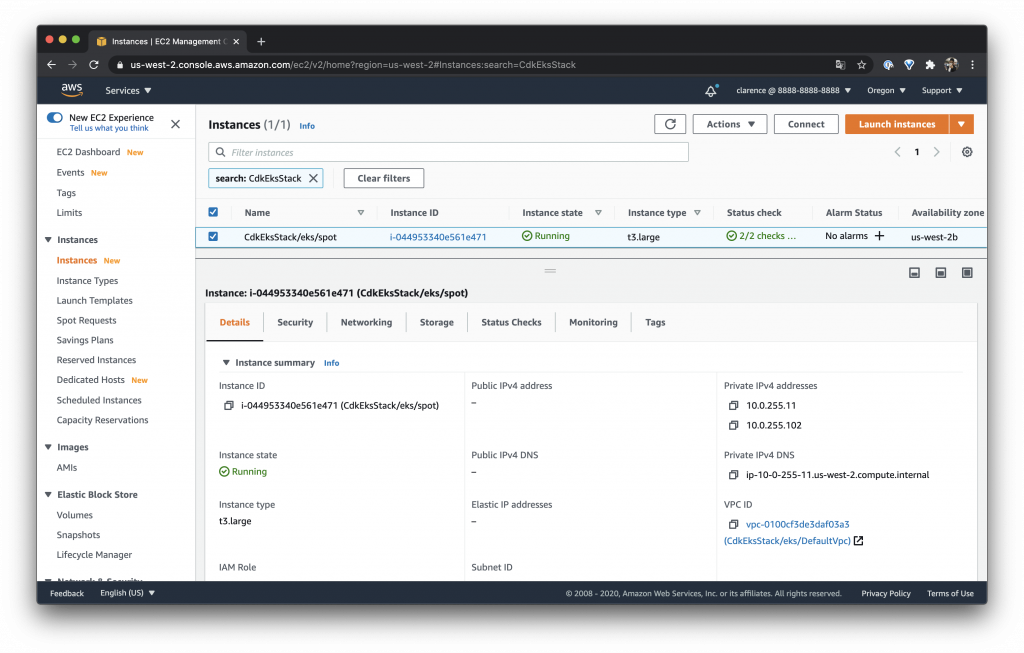
-
Details
- EKS 的 Details 裡面有 API server endpoint 與其他詳細的 EKS 資料
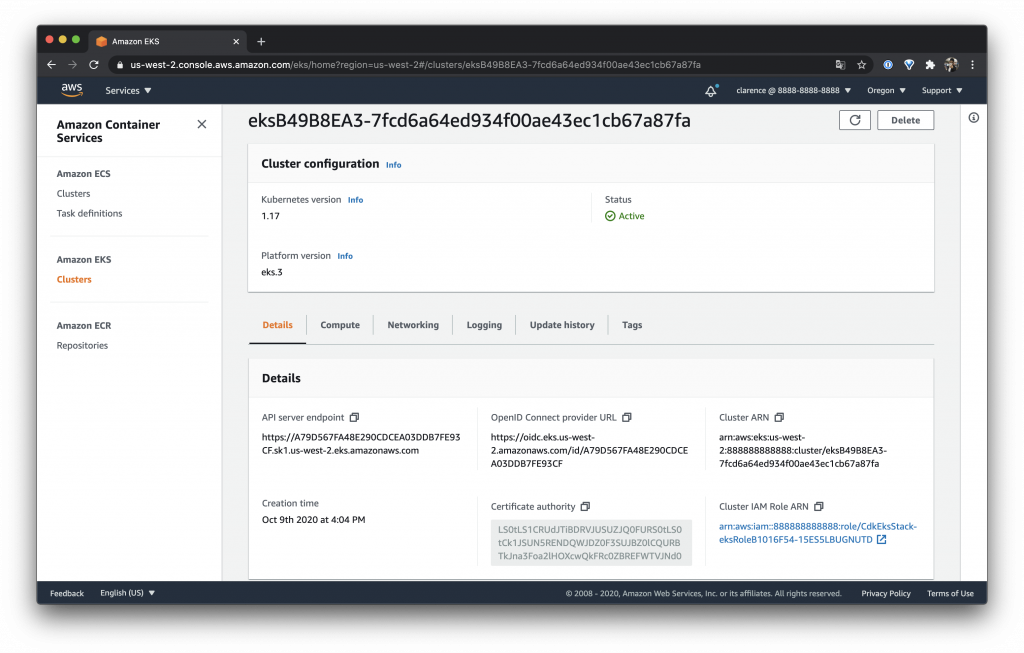
- EKS 的 Details 裡面有 API server endpoint 與其他詳細的 EKS 資料
-
Compute
- 如下可以看到 EKS 的 Compute

- 如下可以看到 EKS 的 Compute
-
Networking
- 另外還有 Networking 裡面有 4 個 Subnets
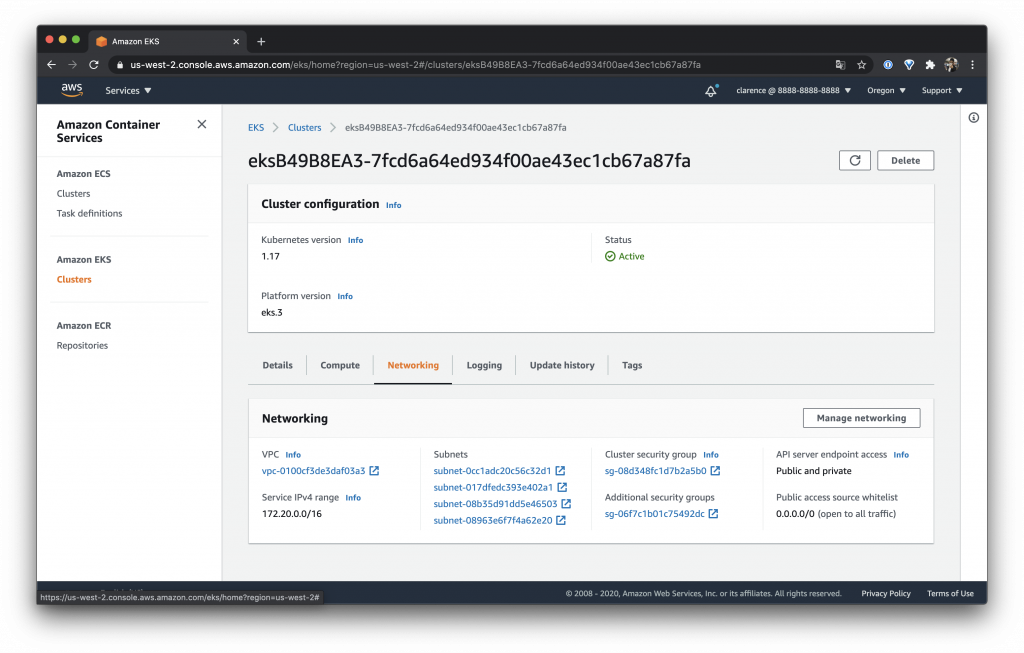
- 另外還有 Networking 裡面有 4 個 Subnets
-
Logging
- 目前我們沒有開啟 EKS 的 Logging 所以裡面都是 Disable 的

- 目前我們沒有開啟 EKS 的 Logging 所以裡面都是 Disable 的
-
Update history
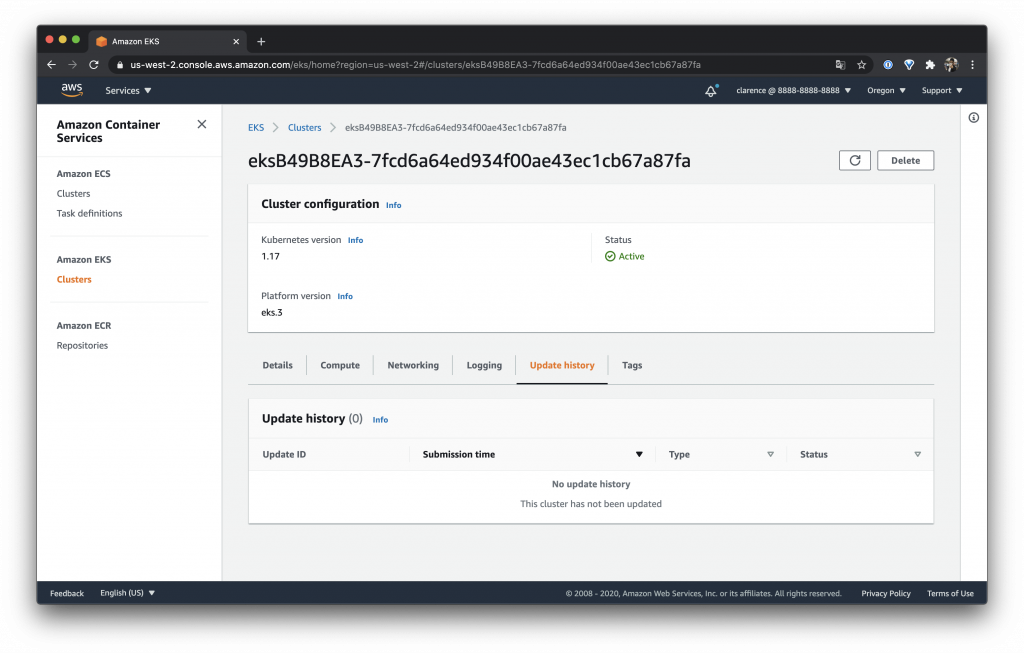
-
Tags
參考資料
- https://aws.amazon.com/tw/eks/
今天介紹 EKS 叢集如果熟悉 K8S 的朋友其實只需要如此就可以開始用一般的方法使用拉!
Day 24 – CDK 建置 Amazon Elastic Container Service(ECS) Service – 一個 Container 服務多個 Port
前面都只有介紹一個 Container 服務一個 Port 那大家是不是有一個疑問如果我的 Container 是多個 Port 的服務有沒有辦法用 ECS 嗎?答案是可以的呦!平常看到的範例都是多個 Port 就要開多個 Container 那我可以節省成本只用一個 Container 就好嗎?答案也是可以的呦!
今天就來教大家怎麼達成這件事情吧!

一個可以服務多個 Port 的程式
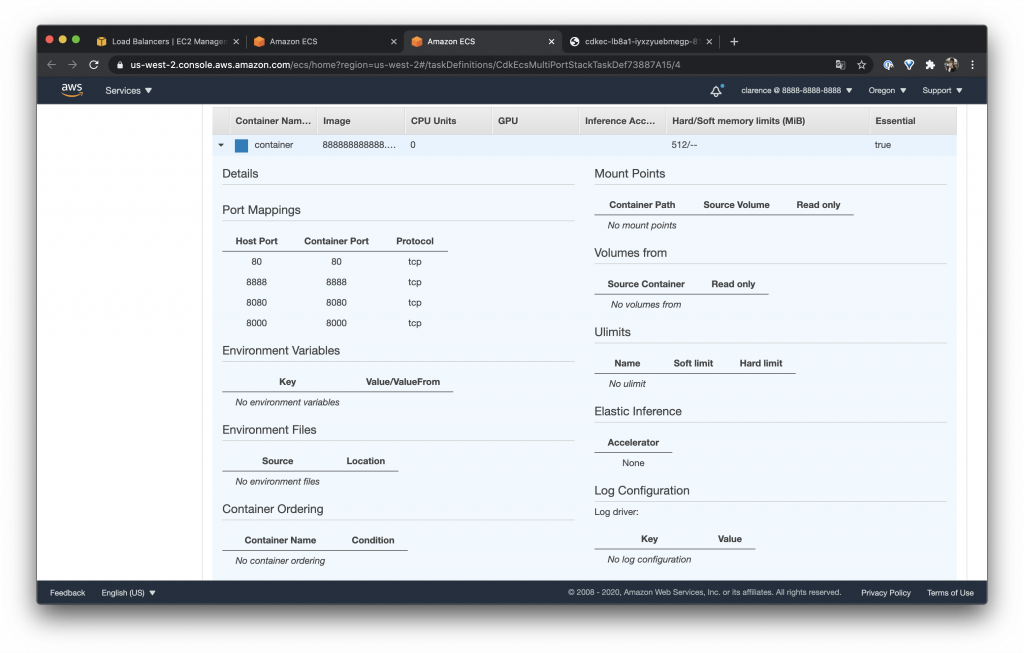
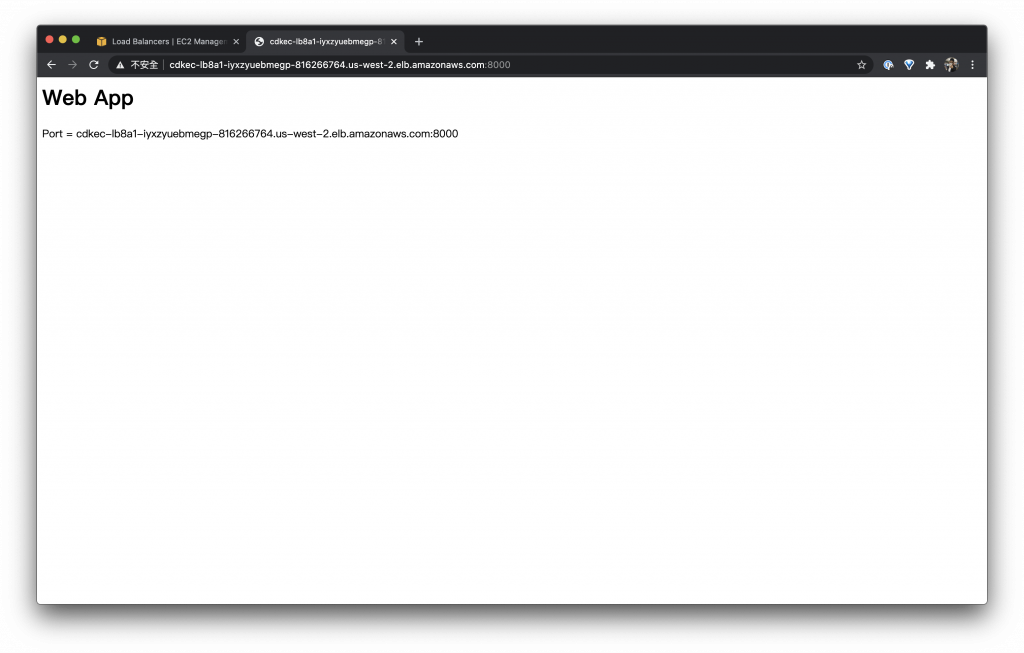
因為要測試多 Port 服務所以我寫了一個測試程式提供給大家測試,它可以顯示目前連線的網址與 Port 這支程式開的 Port 為:80、8080、8000 與 8888

建立 Fargate Task Definition
我們這次的 Task 與之前差不多,主要的重點是這次我們宣告了多個 container port
const taskDefinition = new ecs.FargateTaskDefinition(this, "TaskDef", {
  memoryLimitMiB: 512,
  cpu: 256,
});
const container = taskDefinition.addContainer("container", {
  image: ecs.ContainerImage.fromDockerImageAsset(asset),
  memoryLimitMiB: 512,
});
container.addPortMappings(
  {
    containerPort: 80,
  },
  {
    containerPort: 8888,
  },
  {
    containerPort: 8080,
  },
  {
    containerPort: 8000,
  }
);
如此在 Task Definition 就可以看到我們宣告的 Port Mappings 表
設定 ALB
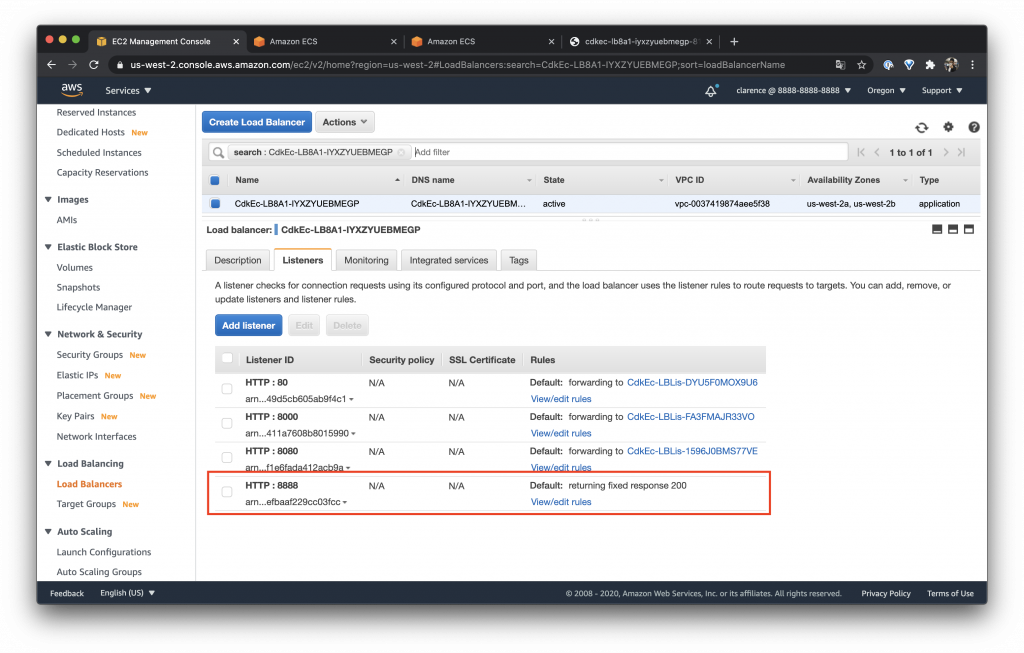
我們在 ALB 上面 Listen 剛剛的 80、8080、8000 與 8888
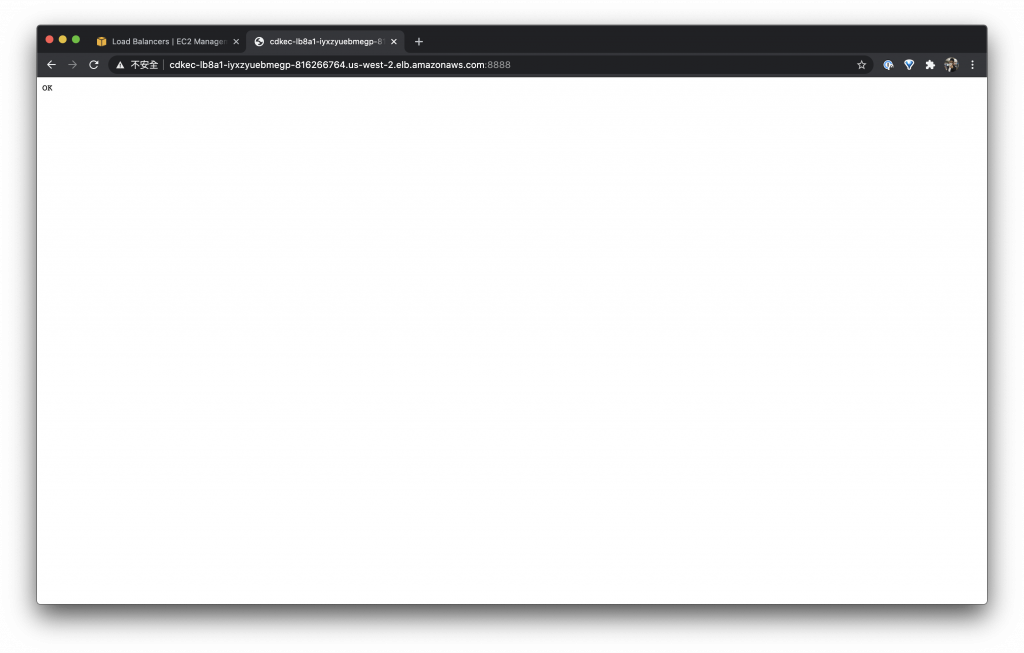
這邊有一個新的設定是 defaultAction 我們希望他在沒有 Rules 的時候做什麼事情,在後面我特別保留了 8888 port 沒有設定,這樣就可以看到它是什麼樣子了!
要注意這個值一定要設定不然會有問題呦!
const lb = new elbv2.ApplicationLoadBalancer(this, "LB", {
  vpc,
  internetFacing: true,
});
const listener1 = lb.addListener("Listener1", {
  port: 80,
  defaultAction: elbv2.ListenerAction.fixedResponse(200, {
    contentType: elbv2.ContentType.TEXT_PLAIN,
    messageBody: "OK",
  }),
});
const listener2 = lb.addListener("Listener2", {
  port: 8080,
  defaultAction: elbv2.ListenerAction.fixedResponse(200, {
    contentType: elbv2.ContentType.TEXT_PLAIN,
    messageBody: "OK",
  }),
});
const listener3 = lb.addListener("Listener3", {
  port: 8888,
  protocol: elbv2.ApplicationProtocol.HTTP,
  defaultAction: elbv2.ListenerAction.fixedResponse(200, {
    contentType: elbv2.ContentType.TEXT_PLAIN,
    messageBody: "OK",
  }),
});
const listener4 = lb.addListener("Listener4", {
  port: 8000,
  defaultAction: elbv2.ListenerAction.fixedResponse(200, {
    contentType: elbv2.ContentType.TEXT_PLAIN,
    messageBody: "OK",
  }),
});
註冊 Targets
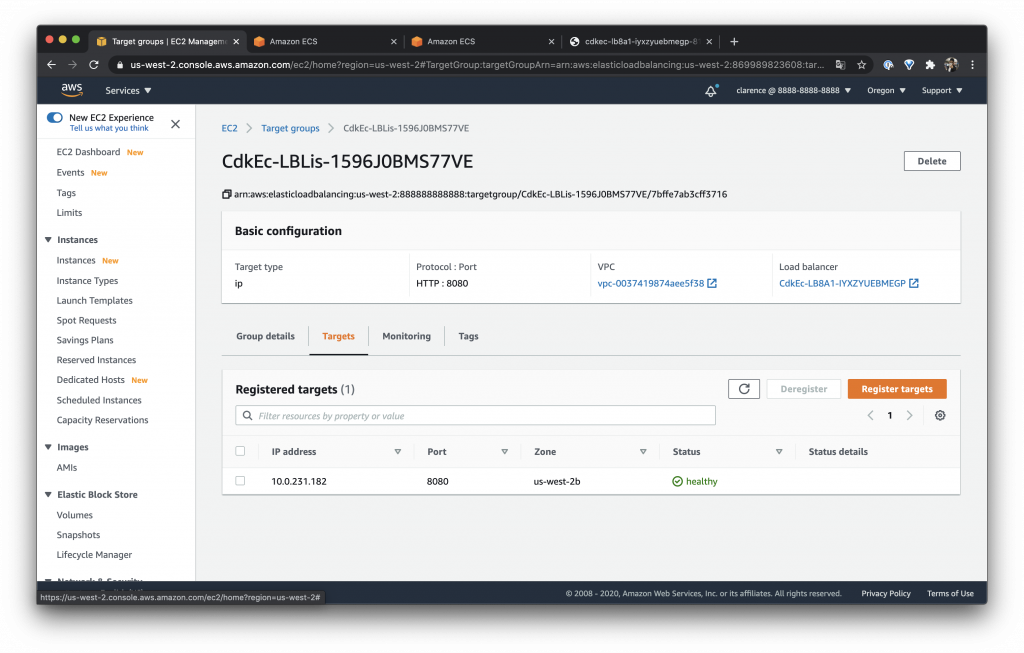
我們分別把 Container 的 port 都跟 Listener 對應保留剛剛說的 8888 沒有設定對應
這邊有一個重點是 containerName 一定要與建立 Fargate Task Definition時設定的一樣,因為他們是靠同一個名稱做連結的
listener1.addTargets("ECS1", {
  port: 80,
  targets: [
    service.loadBalancerTarget({
      containerName: "container",
      containerPort: 80,
    }),
  ],
});

listener2.addTargets("ECS2", {
  port: 8080,
  targets: [
    service.loadBalancerTarget({
      containerName: "container",
      containerPort: 8080,
    }),
  ],
});
listener4.addTargets("ECS4", {
  port: 8000,
  protocol: elbv2.ApplicationProtocol.HTTP,
  targets: [
    service.loadBalancerTarget({
      containerName: "container",
      containerPort: 8000,
    }),
  ],
});
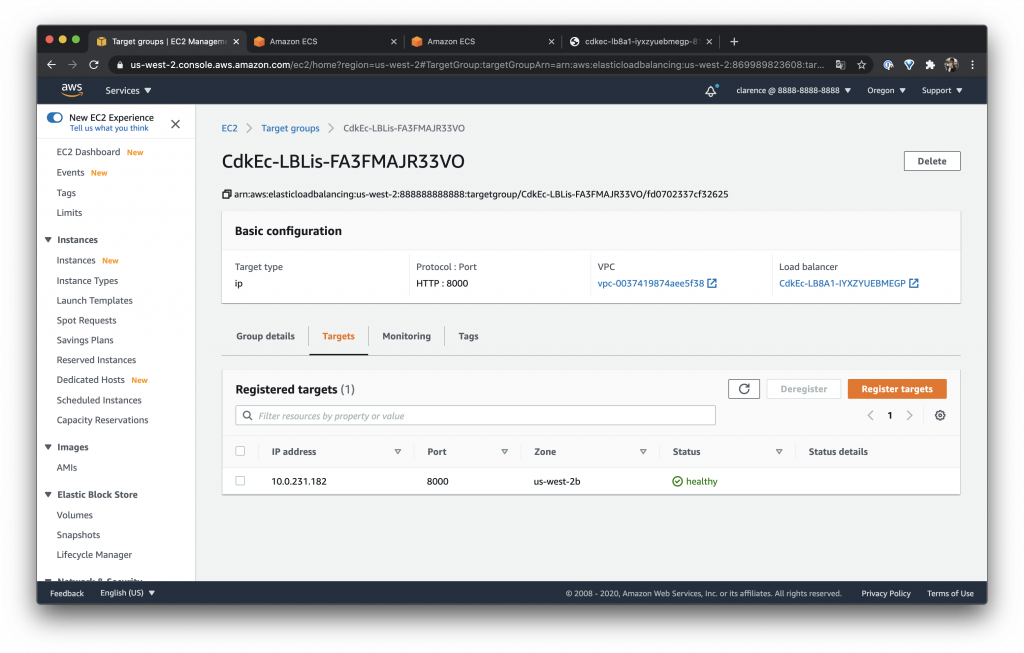
targets 使用同一個 IP
由上面三張圖我們可以觀察到,我們的 ECS Container 都是同一台
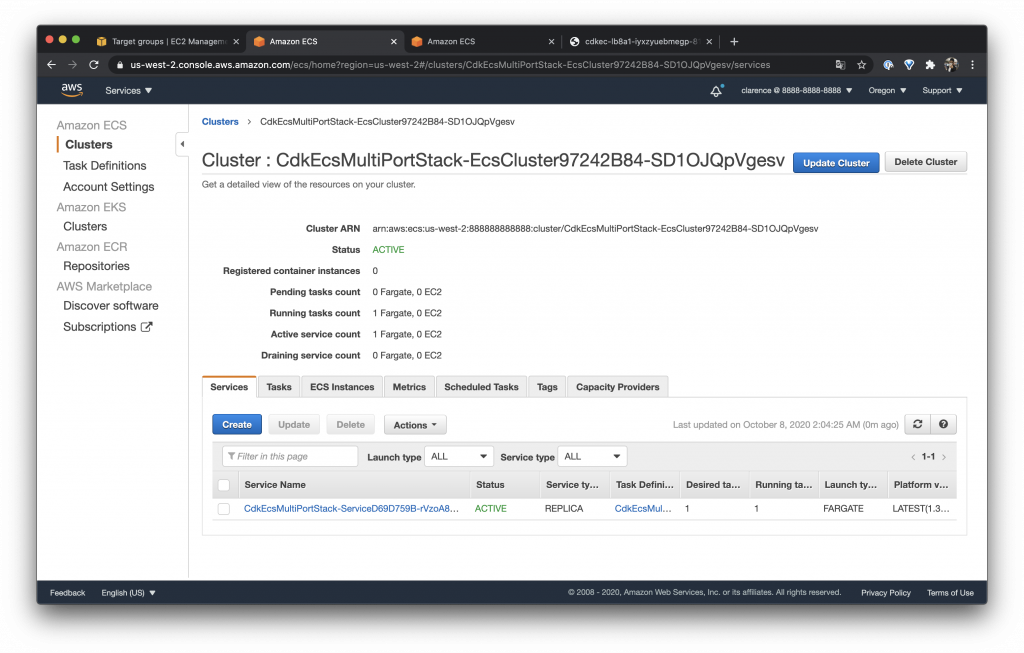
觀察一下
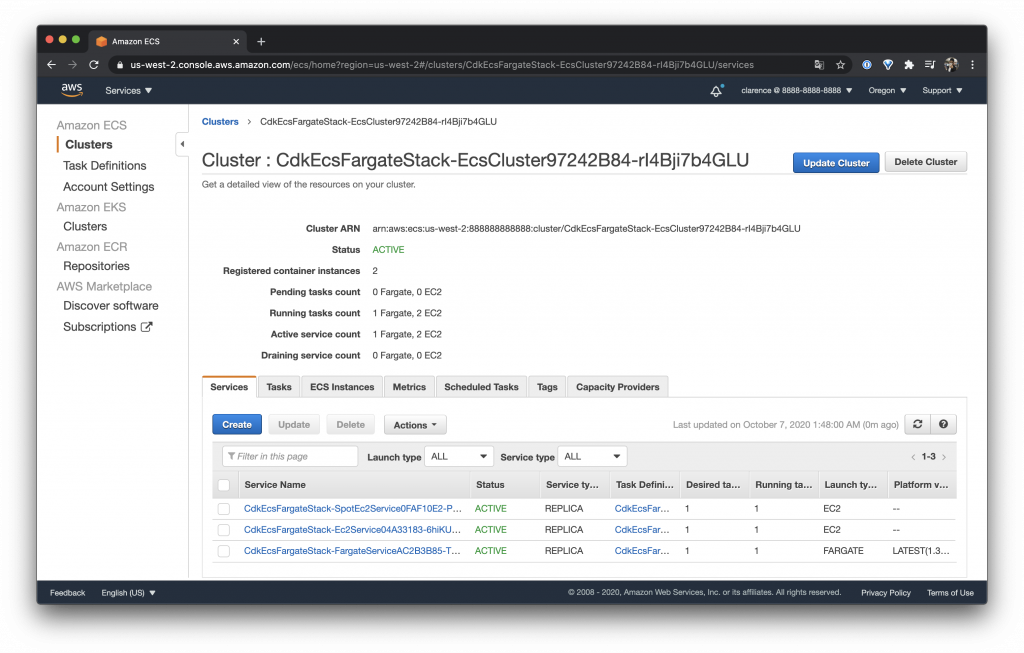
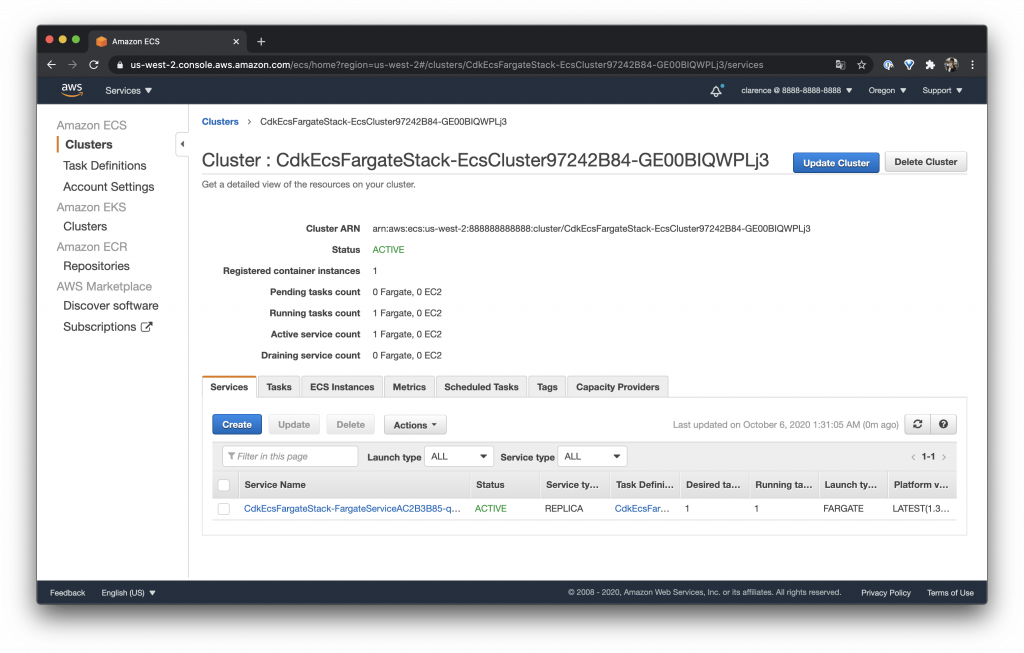
我們可以回到 ECS 的 Service 看一下我們只有一個 Service,而且只有一個 Running 的 Task
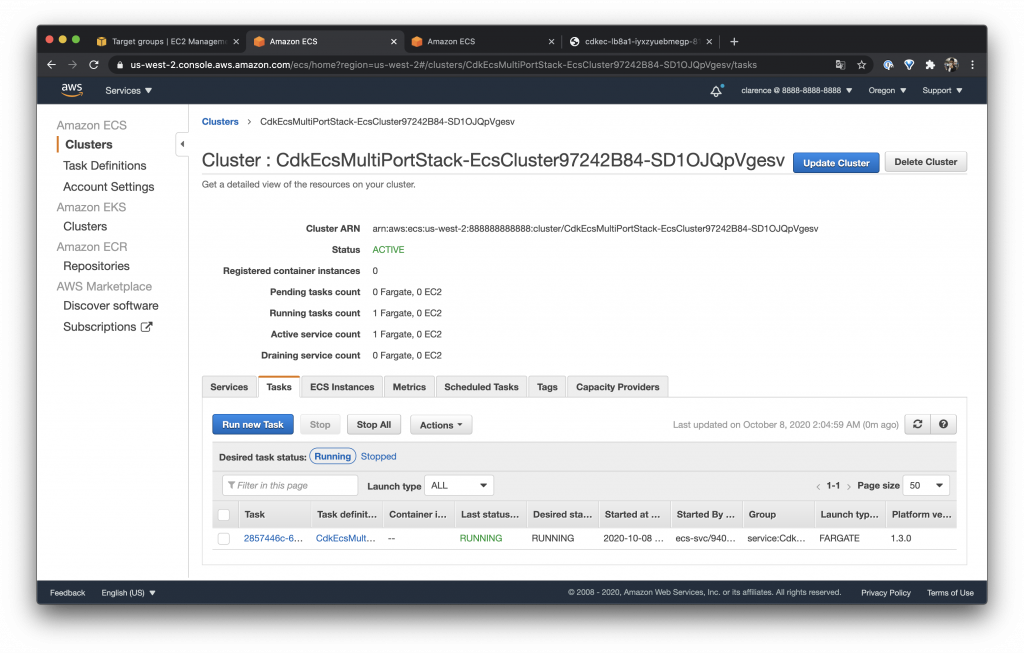
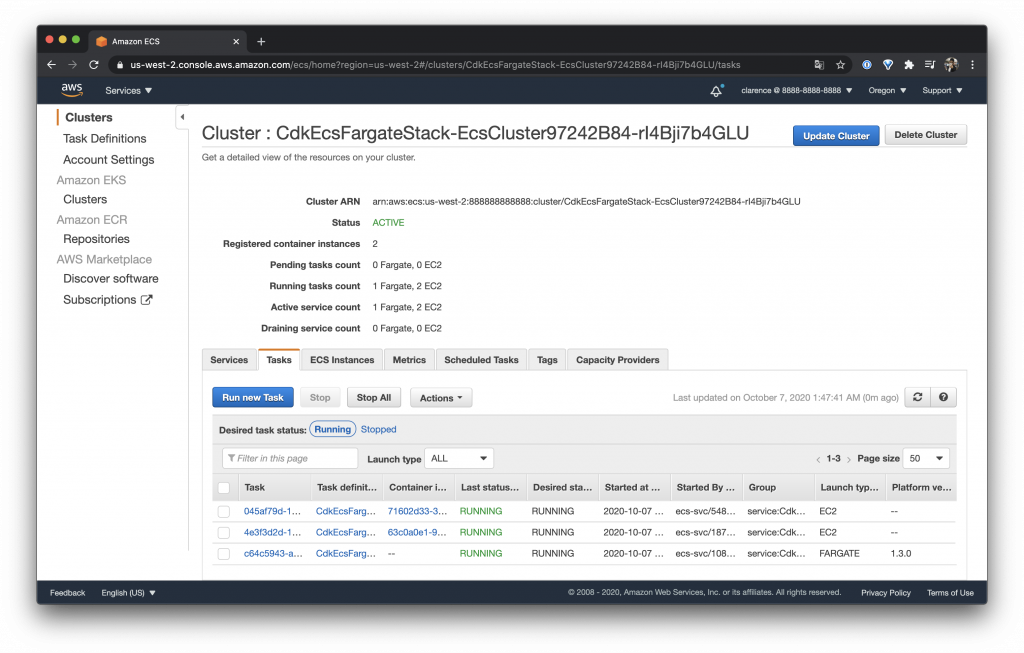
再到 ECS Task 確定只有一個 Task 在跑
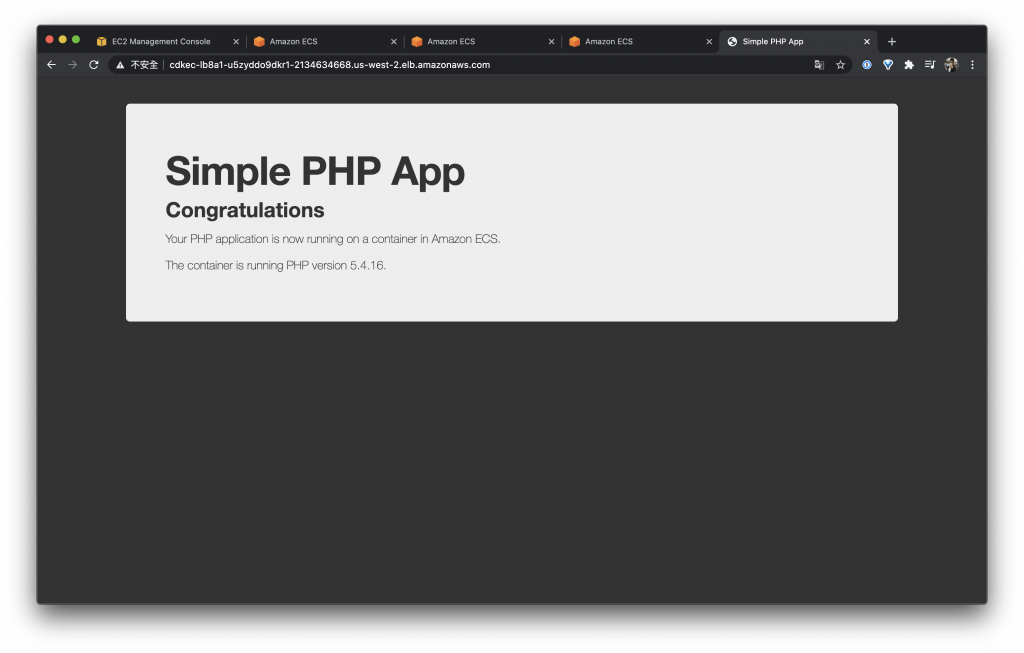
測試一下
我們可以到 ALB 的網址 http://cdkec-lb8a1-iyxzyuebmegp-816266764.us-west-2.elb.amazonaws.com:80/ 看到服務正常並且有讀到 Port
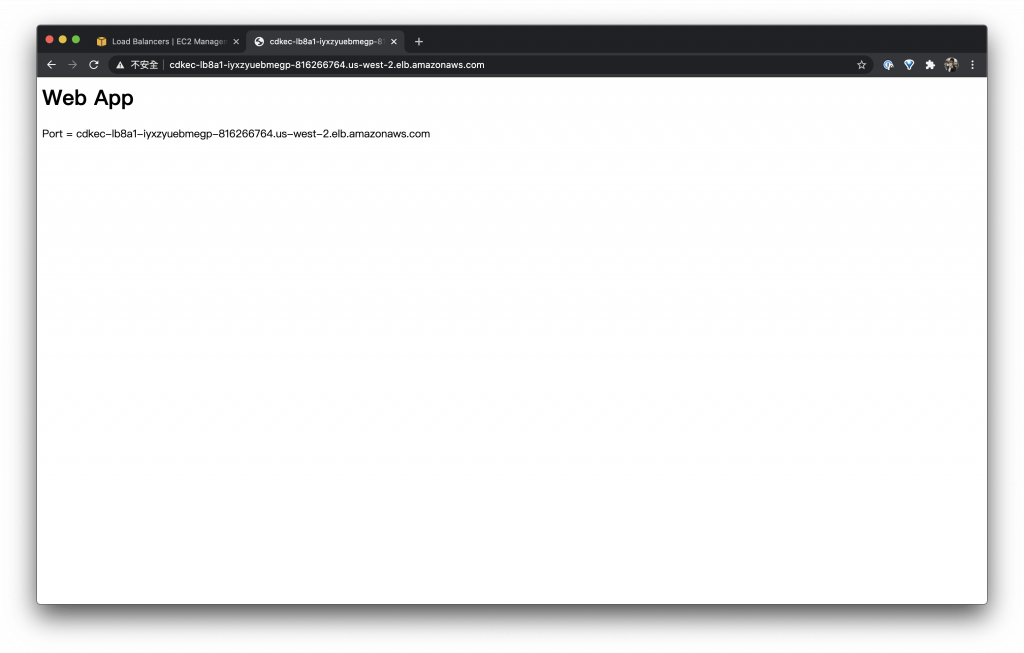
ALB 的網址 http://cdkec-lb8a1-iyxzyuebmegp-816266764.us-west-2.elb.amazonaws.com:8080/ 看到服務正常並且有讀到 Port

ALB 的網址 http://cdkec-lb8a1-iyxzyuebmegp-816266764.us-west-2.elb.amazonaws.com:8000/ 也是一樣的情況
ALB 的網址 http://cdkec-lb8a1-iyxzyuebmegp-816266764.us-west-2.elb.amazonaws.com:8888/ 因為我們剛剛做了一點手腳所以只有回應 Default 的 OK
今天是測試如果一台機器需要服務多個 Port 的範例希望有幫助到大家!
Day 23 – CDK 建置 Amazon Elastic Container Service(ECS) Service – Fargate 與 EC2 混搭
最近討論了 EC2、Spot 與 Fargate 有沒有想過我們是不是可以來一個混搭的系統呢? 混搭系統可以讓我們的系統可以更有彈性的被控制,像是今天可能有顯卡運算資源機器的需求我們就把它掛在 EC2 上面,一般服務型態的服務可以開 EC2 與 EC2 Spot 各半,排成服務就跑在 Fargate 上,流量高的時段就開 EC2 Spot 的機器,這樣聽起來是不是很完美呢 XD ~ 所以今天就來說明怎麼建構一個如此有彈性的系統吧!

建立一個 EC2 與 Fargate 混搭的 ECS Cluster
在開始說明之前先整理一下我們的目標,我們需要擁有三種不同的機器分別是
- On-Demand Instance:t3.micro
- Spot Instance:t3.small
- Fargate
模擬服務可以在不同的機器上面運作,所以需要開三種不同的 Task 分別是
- EC2
- EC2 Spot
- Fargate
建立 ECS Cluster
首先處理 ECS Cluster 並且設定 On-Demand Instance 的 ASG 與 Spot Instance 的 ASG,分別對應到機器等級
- On-Demand Instance:t3.micro
- Spot Instance:t3.small
Fargate 不用自己控制機器所以這邊不用處理
const cluster = new ecs.Cluster(this, "EcsCluster", { vpc });

const autoScalingGroup = cluster.addCapacity(
  "DefaultAutoScalingGroupCapacity",
  {
    instanceType: ec2.InstanceType.of(
      ec2.InstanceClass.T3,
      ec2.InstanceSize.MICRO
    ),
    desiredCapacity: 1,
    machineImage: ecs.EcsOptimizedImage.amazonLinux2(),
  }
);
autoScalingGroup.scaleOnCpuUtilization("KeepCpuHalfwayLoaded", {
  targetUtilizationPercent: 50,
});

const spotAutoScalingGroup = cluster.addCapacity(
  "SpotAutoScalingGroupCapacity",
  {
    instanceType: ec2.InstanceType.of(
      ec2.InstanceClass.T3,
      ec2.InstanceSize.SMALL
    ),
    desiredCapacity: 1,
    machineImage: ecs.EcsOptimizedImage.amazonLinux2(),
    spotPrice: "0.0104",
    spotInstanceDraining: true,
  }
);
spotAutoScalingGroup.scaleOnCpuUtilization("KeepCpuHalfwayLoaded", {
  targetUtilizationPercent: 50,
});
建立完後可以在 ECS Instances 看到有兩種不同大小的機器註冊

建立 Task Definition
使用 Constraints 約束 Task
因為要實現不同類型的機器跑不同的服務這邊介紹一個新的參數 Constraints 它可以用來對 Task 做一些約束像是機器等級系統種類是否有掛 EFS 等等或是一些自訂參數,但是目前 AWS CDK 還不支援設定設定 Attributes 所以自動參數的部分這次沒有辦法做給大家看有興趣可以參考 AWS 文件直接在 console 或是使用 command 實作
使用 TaskDefinition 定義共用 Task
除了 Constraints 這次範例還使用了一個新的 function TaskDefinition 它有一個很好用的屬性 compatibility 使用 EC2_AND_FARGATE 就可以建立一個不管是 EC2 或是 Fargate 都可以一起共用的 Task
AWS VPC
另外還有使用一個特別的 Network Mode AWS VPC 它可以把 ENI 網卡直接掛在 Container 上面,往常我們如果直接使用 EC2 部署沒有使用 Load Balance 是沒有辦法兩個 Container 使用同一個 port 的,畢竟在系統上只有一個 process 可以 bind 一個 port,而使用了 AWS VPC 就不會發生這個問題了,因為大家都可以直接使用自己的獨立網卡拉!
查看 ECS Instance Attributes
上面有提到要使用 Constraints 約束機器可是可以約束的條件要從哪裡找呢?我們可以到 AWS Console ECS 找到 EC2 Instances,在裡面選擇一台機器按下 Actions -> View/Edit Attributes 就可以看到了,如下兩張圖片是我們開設的機器 Attributes
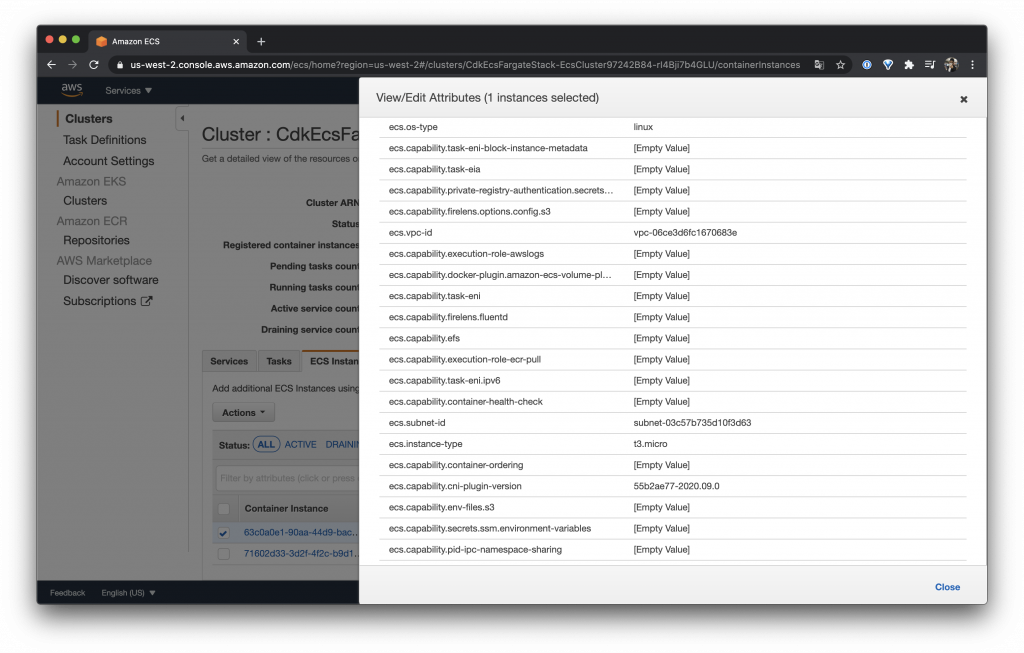
如圖可以看到機器等級是
t3.micro
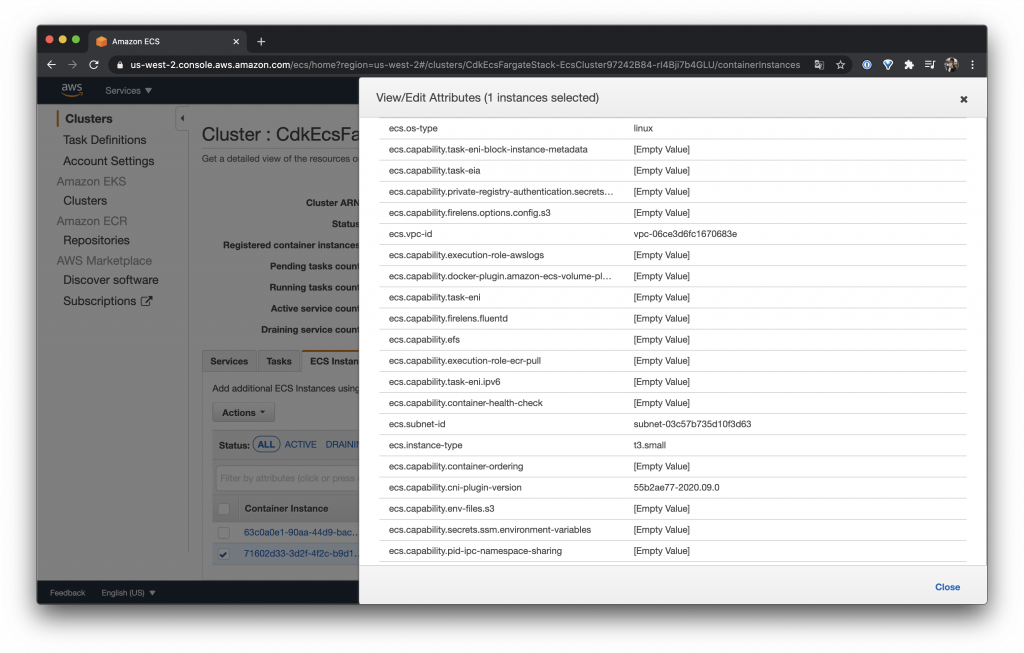
如圖可以看到機器等級是
t3.small
設定 Fargate Task
Fargate 雖然不受 Cluster 管理不過我們一樣要設定 Task
const fargateTaskDefinition = new ecs.FargateTaskDefinition(
this,
"FargateTaskDef",
{
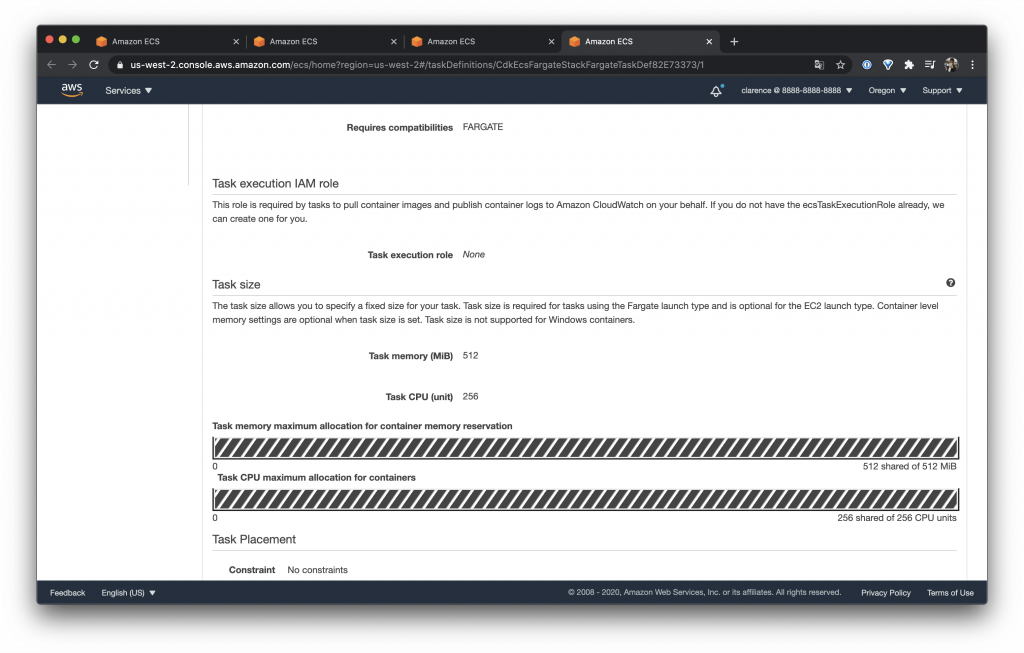
cpu: 256,
memoryLimitMiB: 512,
}
);
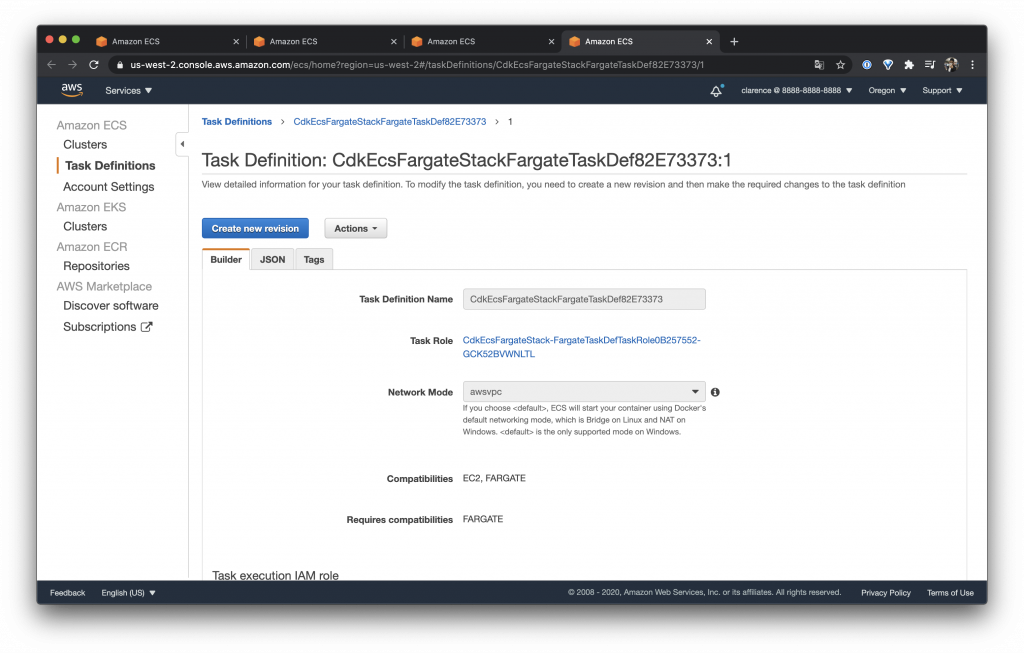
可以在 Task 看到 Network Mode 設定為 awsvpc
可以看到 Constraint 裡面是空的
設定限制機器等級 t3.micro 的 Task Definition
在這邊使用了上面說的 TaskDefinition 所以需要設定 compatibility 為 EC2,不然就要如下使用 Ec2TaskDefinition 不過其實都可以
在前面我們設定 On-Demand Instance 等級為 t3.micro,所以 placementConstraints 設定機器等級限制 t3.micro
const taskDefinition = new ecs.TaskDefinition(this, "TaskDef", {
  cpu: "256",
  memoryMiB: "512",
  compatibility: ecs.Compatibility.EC2,
  networkMode: ecs.NetworkMode.AWS_VPC,
  placementConstraints: [
    ecs.PlacementConstraint.memberOf(
      "attribute:ecs.instance-type == t3.micro"
    ),
  ],
});
可以在 Task 看到 Network Mode 設定為 awsvpc
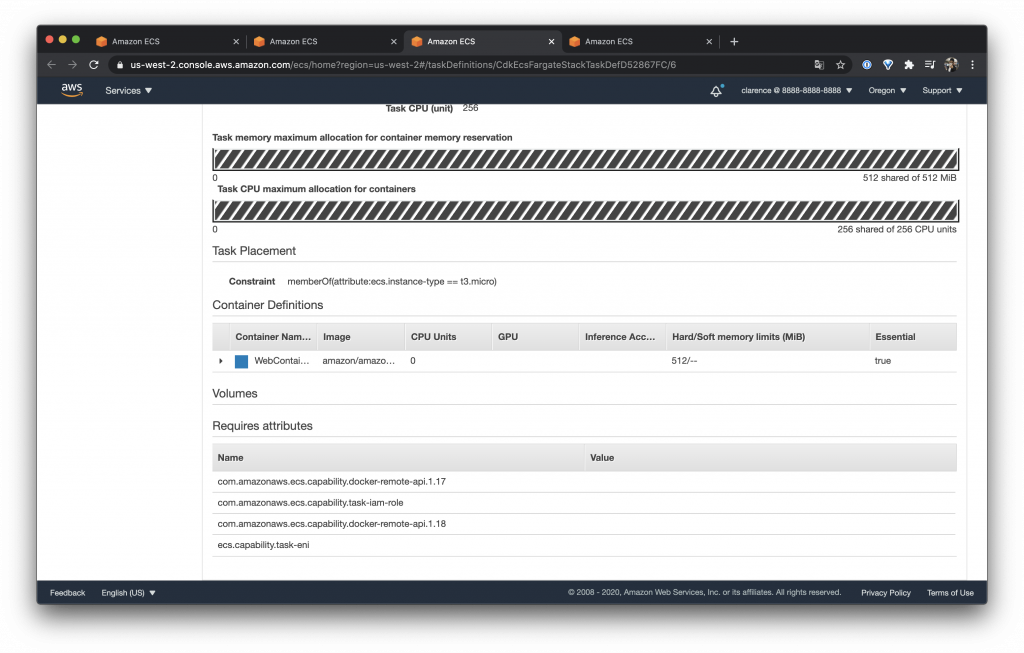
可以在 Constraint 看到限制 type 等級 t3.micro
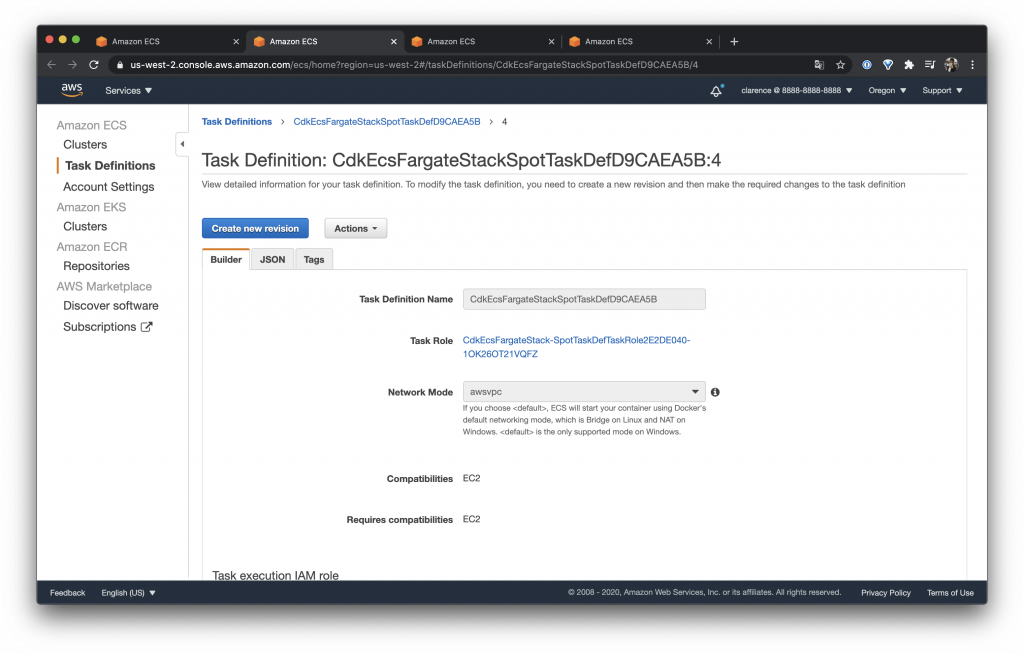
設定限制機器等級 t3.small 的 EC2 Task Definition
而 Spot Instance 等級為 t3.small,所以在 placementConstraints 設定機器等級限制 t3.small
const spotTaskDefinition = new ecs.Ec2TaskDefinition(this, "SpotTaskDef", {
  networkMode: ecs.NetworkMode.AWS_VPC,
  placementConstraints: [
    ecs.PlacementConstraint.memberOf(
      "attribute:ecs.instance-type == t3.small"
    ),
  ],
});

可以在 Task 看到 Network Mode 設定為 awsvpc

可以在 Constraint 看到限制 type 等級 t3.small
在 ECS Tasks 檢查設定
可以在 ECS Tasks 看到上面設定的所有 Task
建立 Container
這次範例使用一樣的 image 來建立範例,不過我們分別使用了不同的 Task Definition 來限制不同的機器種類
const fargateContainer = fargateTaskDefinition.addContainer(
  "WebContainer",
  {
    image: ecs.ContainerImage.fromRegistry("amazon/amazon-ecs-sample"),
    memoryLimitMiB: 512,
  }
);
fargateContainer.addPortMappings({
  containerPort: 80,
});

const container = taskDefinition.addContainer("WebContainer", {
  image: ecs.ContainerImage.fromRegistry("amazon/amazon-ecs-sample"),
  memoryLimitMiB: 512,
});
container.addPortMappings({
  containerPort: 80,
});

const spotContainer = spotTaskDefinition.addContainer("WebContainer", {
  image: ecs.ContainerImage.fromRegistry("amazon/amazon-ecs-sample"),
  memoryLimitMiB: 512,
});
spotContainer.addPortMappings({
  containerPort: 80,
});
設定 Service
建立三種不同的 Service 分別管理不同機器等級的 Task
const fatgetService = new ecs.FargateService(this, "FargateService", {
  cluster,
  taskDefinition: fargateTaskDefinition,
});

const ecsService = new ecs.Ec2Service(this, "Ec2Service", {
  cluster,
  taskDefinition,
});

const spotEcsService = new ecs.Ec2Service(this, "SpotEc2Service", {
  cluster,
  taskDefinition: spotTaskDefinition,
});
建立 ALB
為了方便測試來把三種 Service 加入一樣的 target 吧!如果混搭的目標是用不同的機器跑不同的 Service 就可以分別投入對應的 Load Balancer 拉!
const lb = new elbv2.ApplicationLoadBalancer(this, "LB", {
  vpc,
  internetFacing: true,
});
const listener = lb.addListener("Listener", { port: 80 });

listener.addTargets("ECS2", {
  port: 80,

  targets: [fatgetService, ecsService, spotEcsService],
});
測試
這次也是測試網頁而已就不多提了 XD
今天是一個機器混搭的測試,如此設定就可以在 ECS 部署上有更多的彈性
Day 22 – CDK 建置 Amazon Elastic Container Service(ECS) Service – Fargate
今天來介紹 ECS 使用 Fargate 它是一個由 AWS 直接管理 Container 的服務,之前介紹的 EC2 使用 ECS 需要自己管理 Host 的部分,使用了 Fargate 連 Host 都不用自己管理了,聽起來是不是很吸引人呢 ヽ(●´∀`●)ノ

ECS 使用 Fargate 的好處
不用管理 ECS agent
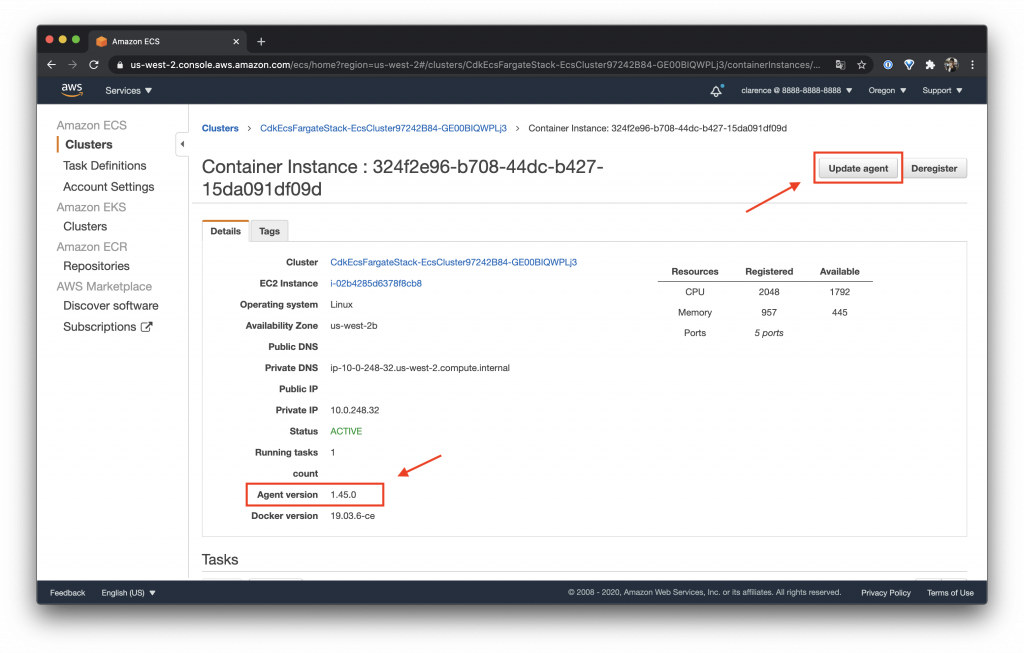
使用 Fargate 除了 Host 不用自己管理之外還有什麼好處呢?另外一個是 ECS agent 的部分,在之前的文章沒有介紹到其實 EC2 如果要跑 ECS 上面會跑有 ECS 的 Agent 而這個版本常常會更新(如左下角),如果更新就需要用右上角的 Update agent 去更新,在更新的時候其實 ECS 會把目前這台機器上所有的 Container 移走那可能就需要自己注意會不會有服務不穩定的問題,如果使用 Fargate 就不用擔心這件事情,因為 AWS 會處理好這件事情
不會有資源浪費
如果自己維護 ECS host 還會遇到像是一台機器可能有 100 vCPU 而我們今天全部的 ECS conatiner 只用到了 80 vCPU 剩下的 20 vCPU 還是需要付費的,而使用 Fargate 就沒有這個問題,因為 Fargate 計價是直接計算 vCPU 與記憶體計價的,用多少拿多少減少資源浪費
用 EC2 沒有好處嗎?
其實也不能說沒有好處,因為如果我們有特別需求需要進入 Host 查看東西或是自己有更多的調教 Host 方法這樣在 Fargate 機器上就沒有辦法實作,所以基本上還是看有需求決定應該怎麼選擇機器
CDK 使用 Fargate
定義 Cluster
就算使用 Fargate 我們還是需要一個 Cluster 來管理我們的 Fargate 機器
const cluster = new ecs.Cluster(this, "EcsCluster", { vpc });
定義 Fargate Task Definition
Fargate 需要定義自己的 Task Definition 與昨天的 EC2 一樣需要先定義 Task Definition
const taskDefinition = new ecs.FargateTaskDefinition(this, "TaskDef");

定義 Container
今天的測試一樣使用 amazon/amazon-ecs-sample 來當測試腳本
const container = taskDefinition.addContainer("WebContainer", {
  image: ecs.ContainerImage.fromRegistry("amazon/amazon-ecs-sample"),
  memoryLimitMiB: 512,
});
container.addPortMappings({
  containerPort: 80,
});
定義 Fargate Service
把剛剛定義好的 Cluster 與 Task Definition 組合成一個 Service
const fatgetService = new ecs.FargateService(this, "FargateService", {
  cluster,
  taskDefinition,
});
定義 ALB
為了測試需要我們還是設定一個 ALB 好讓我們在外面可直接戳 DNS 拿到結果
const lb = new elbv2.ApplicationLoadBalancer(this, "LB", {
  vpc,
  internetFacing: true,
});
const listener = lb.addListener("Listener", { port: 80 });
listener.addTargets("ECS", {
  port: 80,
  targets: [fatgetService],
});
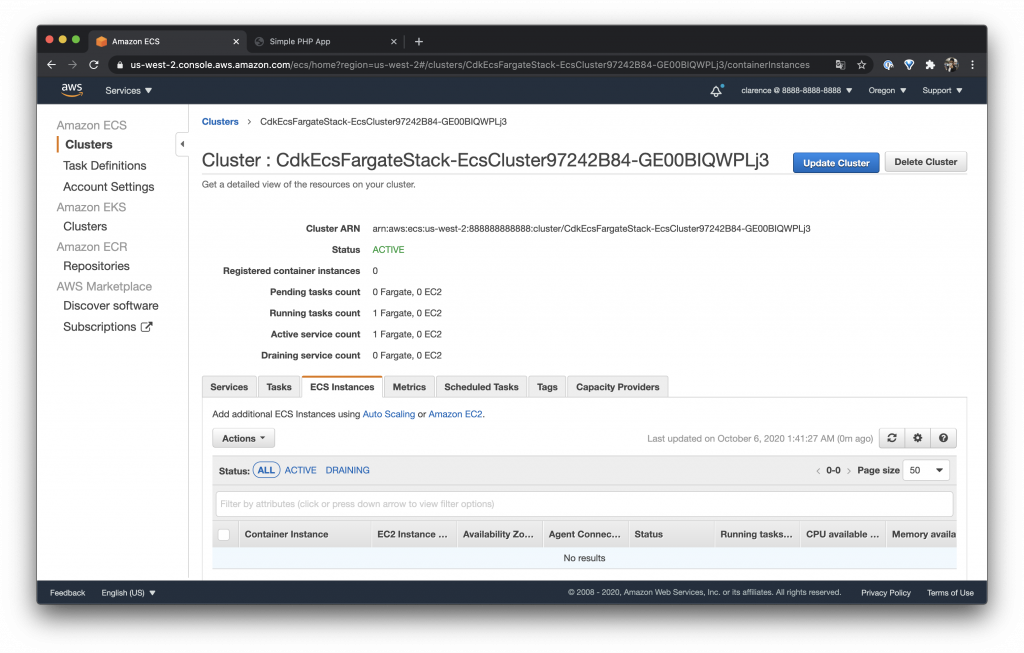
觀察一下 ECS Instances
我們可以看一下如果是使用 Fargate 的 task 就不會在 ECS Instances 的地方看到任何機器囉!
整理一下
其實整個程式量真的很少大概 30 行就可以起一個可以用的 Web 服務而且是高可用性的真的很簡單 ~
const vpc = new ec2.Vpc(this, "Vpc", { maxAzs: 3, natGateways: 1 });

const cluster = new ecs.Cluster(this, "EcsCluster", { vpc });

const taskDefinition = new ecs.FargateTaskDefinition(this, "TaskDef");

const container = taskDefinition.addContainer("WebContainer", {
  image: ecs.ContainerImage.fromRegistry("amazon/amazon-ecs-sample"),
  memoryLimitMiB: 512,
});
container.addPortMappings({
  containerPort: 80,
});

const fatgetService = new ecs.FargateService(this, "FargateService", {
  cluster,
  taskDefinition,
});

const lb = new elbv2.ApplicationLoadBalancer(this, "LB", {
  vpc,
  internetFacing: true,
});
const listener = lb.addListener("Listener", { port: 80 });
listener.addTargets("ECS", {
  port: 80,
  targets: [fatgetService],
});
測試 ALB
最後我們還是測試一下 ALB 的結果,可想而知一定也是正常拉 XD
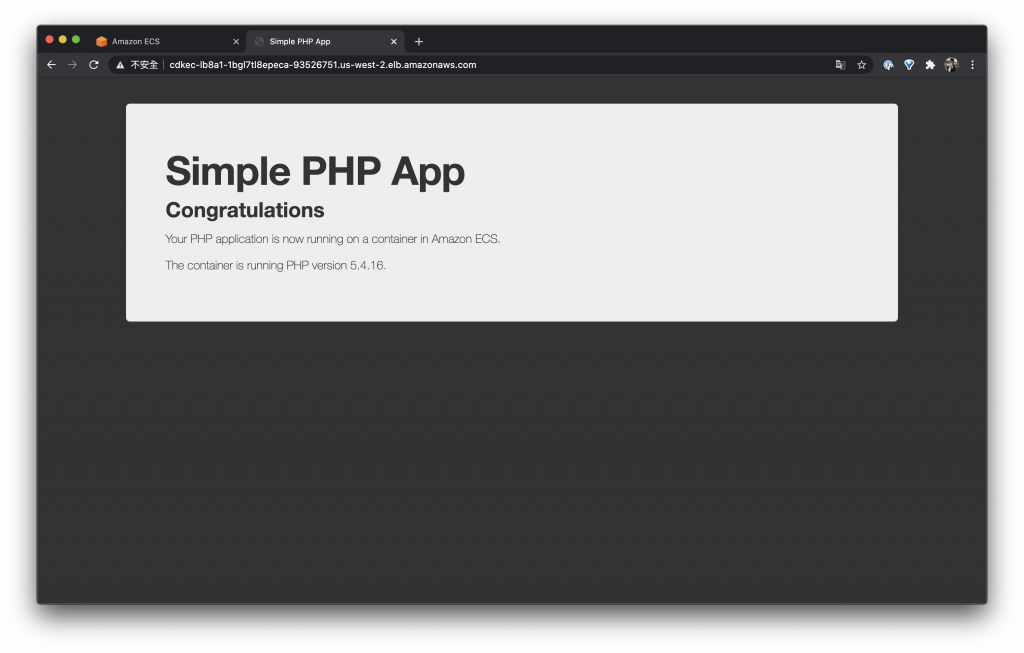
今天教大家實作 Fargate 機器,其實如果是小團隊我滿推薦使用 Fargate 的因為他的價錢其實跟實際開一台一樣等級的機器差不多,而且可以減少很多麻煩事 XD ~
Day 21 – CDK 建置 Amazon Elastic Container Service(ECS)Service – EC2 與 RDS
我們的 ECS Container 不會只有單存一個服務自己跑,通常都會需要與資料庫做一個連結,所以今天就來說明如何讓 ECS Container 與 RDS 連結

建立一個 ECS 與 RDS 關聯的 Web 服務
建立 RDS
先建立一個 RDS 與前面不一樣的地方是不直接指定密碼,而是讓 RDS 直接產生密碼到 AWS Secrets Manager,如此是比較安全的做法因為我們的程式不會保管密碼,也不會再部署的過程中看到密碼,要取得密碼就需要經過 Secrets Manager
const rdsInstance = new rds.DatabaseInstance(this, "Database", {
  engine: rds.DatabaseInstanceEngine.mysql({
    version: rds.MysqlEngineVersion.VER_8_0_19,
  }),
  vpc,
  deleteAutomatedBackups: true,
  instanceType: ec2.InstanceType.of(
    ec2.InstanceClass.BURSTABLE3,
    ec2.InstanceSize.MICRO
  ),
  allocatedStorage: 10,
  credentials: {
    username: "admin",
  },
});
要取得資料庫需要經過 Secrets Manager 而取得的過程需要使用 secretArn
new cdk.CfnOutput(this, "DatabaseSecretArn", {
  value: rdsInstance.secret!.secretArn,
});
如此資料庫的地方就完畢了
建立 ECS Cluster
因為測試使用就建立一個 ASG 就好
const cluster = new ecs.Cluster(this, "EcsCluster", { vpc });

const autoScalingGroup = cluster.addCapacity(
  "DefaultAutoScalingGroupCapacity",
  {
    instanceType: ec2.InstanceType.of(
      ec2.InstanceClass.T3,
      ec2.InstanceSize.MICRO
    ),
    minCapacity: 1,
    desiredCapacity: 1,
    maxCapacity: 6,
    machineImage: ecs.EcsOptimizedImage.amazonLinux2(),
    spotPrice: "0.0136",
    spotInstanceDraining: true,
  }
);
autoScalingGroup.scaleOnCpuUtilization("KeepCpuHalfwayLoaded", {
  targetUtilizationPercent: 50,
});
建立 Docker
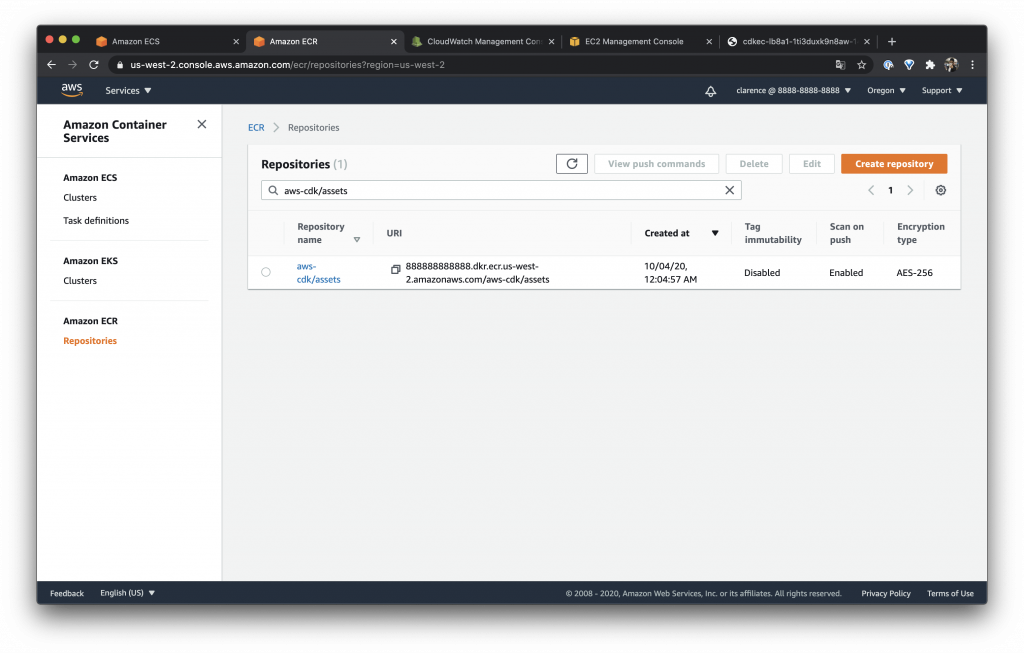
這邊我們使用 DockerImageAsset 來讓本機跑一個 Dockerfile 編譯一個 Docker Image 上傳到 ECR 上面
const asset = new DockerImageAsset(this, "BuildImage", {
  directory: path.join(__dirname, "../", "image"),
});
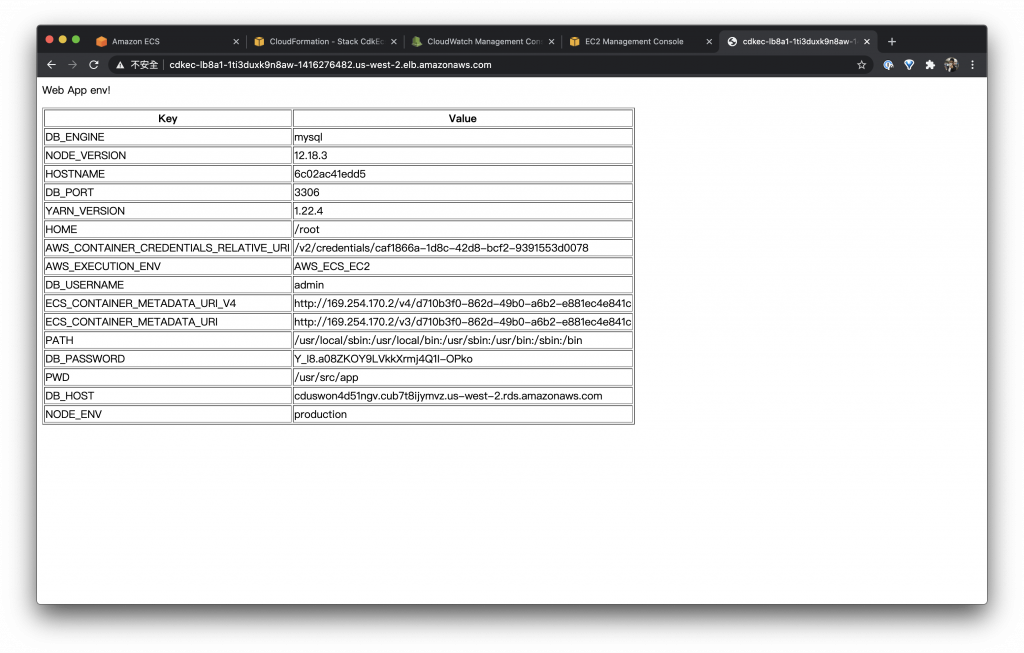
而這邊為了方便理解 Secrets Manager 是如何讓 ECS 吃到的密碼所以我寫了一個簡單的 Web,可以用來看所有 Docker 吃進去的 environment
所以只要建立一個資料夾 image 並且下載 web-app-env 就可以了
mkdir image
git clone https://github.com/clarencetw/web-app-env.git
Github: web-app-env
上傳成功的 Docker 可以在 ECR 看到它
建立 Task Definition
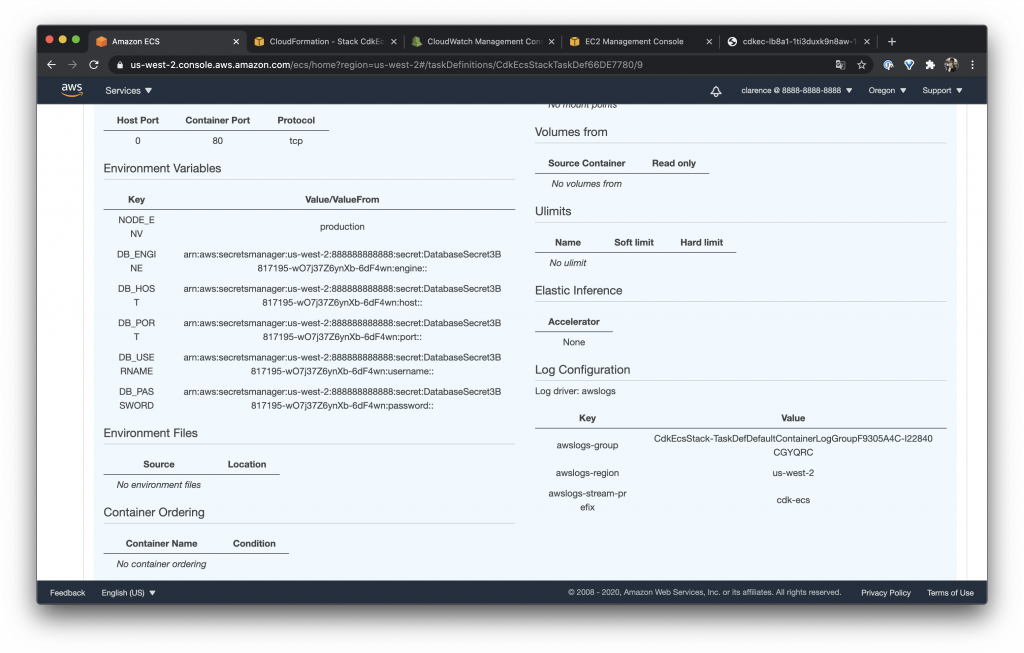
這次的 Task 主要定義了普通的 environment
- NODE_ENV
與 secret 而 secret 可以使用 ecs.Secret.fromSecretsManager(rdsInstance.secret!) 可以直接解出整個 rdsInstance.secret 的 JSON,而我這邊就直接把 rdsInstance 裡面的 JSON 直接解出來在程式使用上比較方便
- DB_ENGINE
- DB_HOST
- DB_PORT
- DB_USERNAME
- DB_PASSWORD
const taskDefinition = new ecs.Ec2TaskDefinition(this, "TaskDef");

const container = taskDefinition.addContainer("DefaultContainer", {
  image: ecs.ContainerImage.fromDockerImageAsset(asset),
  memoryLimitMiB: 16,
  logging: ecs.LogDrivers.awsLogs({ streamPrefix: "cdk-ecs" }),
  environment: {
    NODE_ENV: "production",
  },
  secrets: {
    DB_ENGINE: ecs.Secret.fromSecretsManager(rdsInstance.secret!, "engine"),
    DB_HOST: ecs.Secret.fromSecretsManager(rdsInstance.secret!, "host"),
    DB_PORT: ecs.Secret.fromSecretsManager(rdsInstance.secret!, "port"),
    DB_USERNAME: ecs.Secret.fromSecretsManager(
      rdsInstance.secret!,
      "username"
    ),
    DB_PASSWORD: ecs.Secret.fromSecretsManager(
      rdsInstance.secret!,
      "password"
    ),
  },
});
container.addPortMappings({
  containerPort: 80,
});
設定完的 Task 可以直接在 ECS 看到指定成 Secrets Manager
設定 ECS Service
const ecsService = new ecs.Ec2Service(this, "Service", {
  cluster,
  taskDefinition,
});
設定 ALB 服務
其實我們的服務只要在 CDK 建立成 service 在 LB 就很好控制了,我們只要在 targets 把 ecsService 放進去就可以了
const lb = new elbv2.ApplicationLoadBalancer(this, "LB", {
  vpc,
  internetFacing: true,
});
const listener = lb.addListener("Listener", { port: 80 });
const targetGroup = listener.addTargets("ECS", {
  port: 80,
  targets: [ecsService],
});
設定 security group
這邊要注意一下我們需要允許 ECS Service 可以存取 RDS,如果沒有設定會不能連線的
rdsInstance.connections.allowFrom(ecsService, ec2.Port.tcp(3306));
整理一下
const vpc = new ec2.Vpc(this, "Vpc", { maxAzs: 3, natGateways: 1 });

const rdsInstance = new rds.DatabaseInstance(this, "Database", {
  engine: rds.DatabaseInstanceEngine.mysql({
    version: rds.MysqlEngineVersion.VER_8_0_19,
  }),
  vpc,
  deleteAutomatedBackups: true,
  instanceType: ec2.InstanceType.of(
    ec2.InstanceClass.BURSTABLE3,
    ec2.InstanceSize.MICRO
  ),
  allocatedStorage: 10,
  credentials: {
    username: "admin",
  },
});

const cluster = new ecs.Cluster(this, "EcsCluster", { vpc });

const autoScalingGroup = cluster.addCapacity(
  "DefaultAutoScalingGroupCapacity",
  {
    instanceType: ec2.InstanceType.of(
      ec2.InstanceClass.T3,
      ec2.InstanceSize.MICRO
    ),
    minCapacity: 1,
    desiredCapacity: 1,
    maxCapacity: 6,
    machineImage: ecs.EcsOptimizedImage.amazonLinux2(),
    spotPrice: "0.0136",
    spotInstanceDraining: true,
  }
);
autoScalingGroup.scaleOnCpuUtilization("KeepCpuHalfwayLoaded", {
  targetUtilizationPercent: 50,
});

const asset = new DockerImageAsset(this, "BuildImage", {
  directory: path.join(__dirname, "../", "image"),
});

const taskDefinition = new ecs.Ec2TaskDefinition(this, "TaskDef");

const container = taskDefinition.addContainer("DefaultContainer", {
  image: ecs.ContainerImage.fromDockerImageAsset(asset),
  memoryLimitMiB: 16,
  logging: ecs.LogDrivers.awsLogs({ streamPrefix: "cdk-ecs" }),
  environment: {
    NODE_ENV: "production",
  },
  secrets: {
    DB_ENGINE: ecs.Secret.fromSecretsManager(rdsInstance.secret!, "engine"),
    DB_HOST: ecs.Secret.fromSecretsManager(rdsInstance.secret!, "host"),
    DB_PORT: ecs.Secret.fromSecretsManager(rdsInstance.secret!, "port"),
    DB_USERNAME: ecs.Secret.fromSecretsManager(
      rdsInstance.secret!,
      "username"
    ),
    DB_PASSWORD: ecs.Secret.fromSecretsManager(
      rdsInstance.secret!,
      "password"
    ),
  },
});
container.addPortMappings({
  containerPort: 80,
});

const ecsService = new ecs.Ec2Service(this, "Service", {
  cluster,
  taskDefinition,
});

const lb = new elbv2.ApplicationLoadBalancer(this, "LB", {
  vpc,
  internetFacing: true,
});
const listener = lb.addListener("Listener", { port: 80 });
const targetGroup = listener.addTargets("ECS", {
  port: 80,
  targets: [ecsService],
});

rdsInstance.connections.allowFrom(ecsService, ec2.Port.tcp(3306));
今天的服務主要是教大家如何在 ECS 使用一個可以連接 RDS 的服務,希望有幫助到大家 ~