Trellis 介紹
Trellis 是 Roots 提供的一個用於自動化 WordPress 網站部署和伺服器管理的工具。
Trellis 的主要功能和特點包括:
- 自動化部署:Trellis 允許開發者使用 Ansible,一種自動化工具,來配置和部署 WordPress 網站到伺服器上。這讓部署過程變得更加容易,節省了大量手動設置的時間。
- 伺服器管理:Trellis 能夠管理整個伺服器的設定,包括安裝必要的軟體和服務,設置防火牆規則,以及優化伺服器性能等。
- 虛擬化支援:Trellis 支援虛擬化技術,如 Vagrant 和 VirtualBox,這讓你可以在本機開發和測試網站,然後再輕鬆地部署到實際伺服器上。
- 安全性:Trellis 遵循最佳的安全實踐,並且自動配置 SSL 憑證,確保網站的安全性和加密連線。
- 版本控制整合:Trellis 整合了 Git 版本控制,這讓多人協作開發網站變得更加順暢,而且方便回滾到之前的版本。
- 可擴展性:Trellis 的架構設計使得它非常靈活和可擴展,可以適應各種大小和類型的 WordPress 網站專案。
總的來說,Trellis 是一個強大的工具,能夠幫助 WordPress 開發者更有效率地管理和部署網站,並確保在開發和生產環境中都能保持一致的設定。使用 Trellis 可以大幅簡化 WordPress 網站的部署流程,減少可能出現的錯誤,讓開發者可以更專注於網站的功能和內容開發。
使用 GitHub Actions 自動部署 Trellis
如果您的機器可以讓 GitHub Actions 直接 SSH 進去,那麼今天的任務將非常簡單,您只需要在.github/workflows/deploy.yml 中新增以下的腳本,就可以輕鬆自動部署:
# Placeholder `setup-trellis-cli` action for deploying Trellis sites

name: Deploy Production site

on:
  workflow_dispatch:
  push:
    branches: [master]

jobs:
  deploy:
    runs-on: ubuntu-latest

    steps:
    - uses: actions/checkout@v2
    - uses: shimataro/ssh-key-action@v2
      with:
        key: ${{ secrets.TRELLIS_DEPLOY_SSH_PRIVATE_KEY }}
        known_hosts: ${{ secrets.TRELLIS_DEPLOY_SSH_KNOWN_HOSTS }}
        if_key_exists: ignore
    - uses: webfactory/[email protected]
      with:
        ssh-private-key: ${{ secrets.TRELLIS_DEPLOY_SSH_PRIVATE_KEY }}
    - uses: roots/setup-trellis-cli@v1
      with:
        repo-token: ${{ secrets.GITHUB_TOKEN }}
        ansible-vault-password: ${{ secrets.ANSIBLE_VAULT_PASSWORD }}
    - name: Deploy
      run: trellis deploy production
接下來,您需要到 “Settings -> Secrets and variables -> Actions -> Secrets” 新增以下參數:
- ANSIBLE_VAULT_PASSWORD: ansible vault 的密碼
- TRELLIS_DEPLOY_SSH_KNOWN_HOSTS: 主機的 known hosts
- TRELLIS_DEPLOY_SSH_PRIVATE_KEY: 可以 SSH 進去主機的 private key
設定完成後,確保已修改 trellis/hosts/production 裡面的 IP 地址,然後將這些更改提交,即可實現自動部署成功。
如果機器無法被 GitHub Actions 主動 SSH 的解決方法
如果無法被主動 SSH,您可以使用 self-hosted runner 來解決這個問題。
GitHub Actions 是 GitHub 提供的一個內建於其平台的持續整合 (Continuous Integration, CI) 和持續部署 (Continuous Deployment, CD) 服務。GitHub Actions 可以讓你自動化建置、測試和部署你的程式碼,使得軟體開發流程更加高效和可靠。
而 “self-hosted” 是 GitHub Actions 中的一個選項,它指的是你可以在自己的伺服器上設置和運行 GitHub Actions Runner。GitHub Actions Runner 是負責執行 CI/CD 工作流程的代理程式。它負責接收 GitHub 上的指令,並在自己的伺服器上運行所需的工作,如建置、測試和部署代碼。如此沒有辦法被主動 SSH 的問題就可以得已解決。
安裝 self-hosted runner 的方法如下
如果你的 self-hosted 是給某個專案用的,那你就可以直接點選目前專案的 Settings -> Actions -> Runners
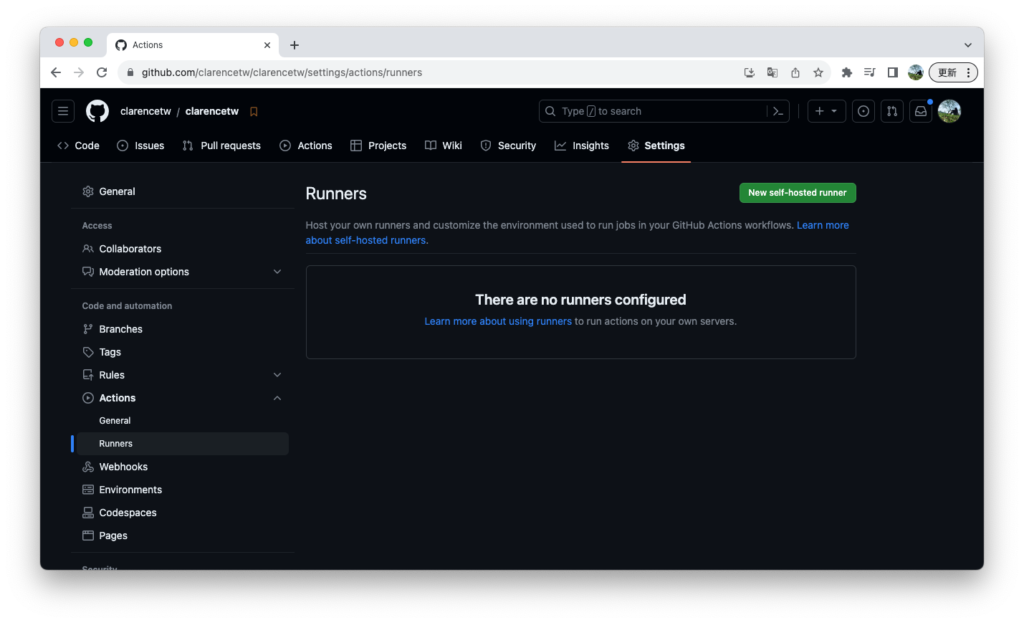
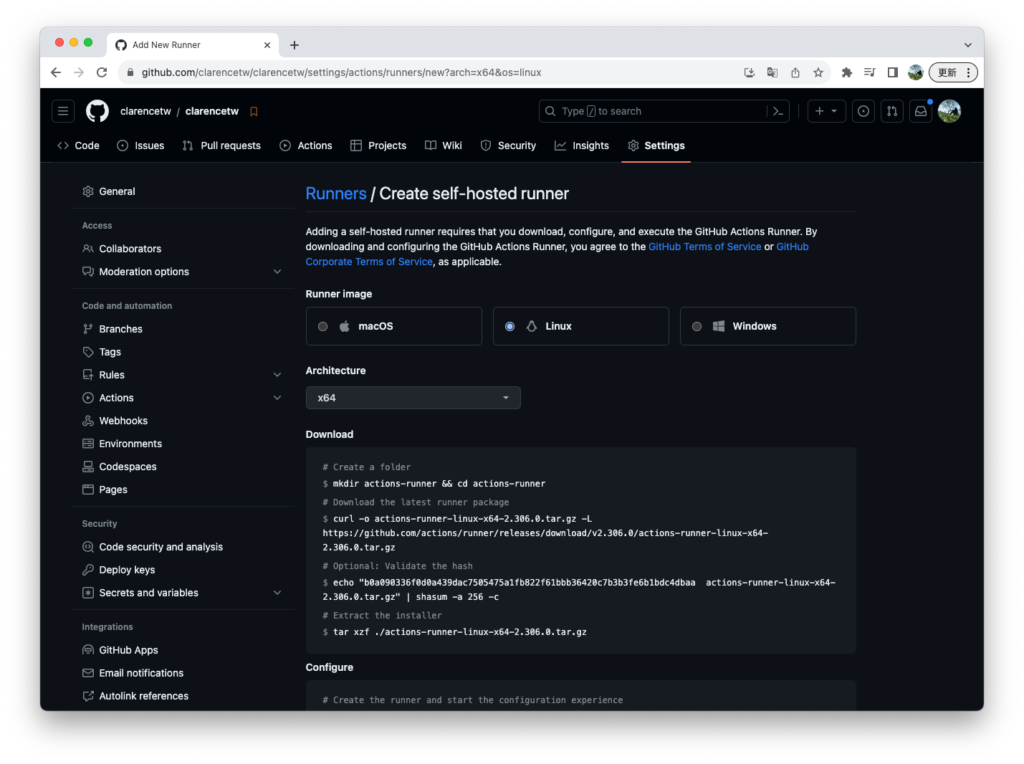
點選右上角的 New self-hosted runner 的選項裡面會有安裝教學,主要選擇一下你的系統然後就依照它的步驟把它安裝進去你的機器,就成功了。
設定 Configure
deploy@localhost:~/actions-runner$ ./config.sh --url https://github.com/clarencetw/clarencetw --token ABLPF4YEEEEEEYO5SAA24LDEYCQDQ

--------------------------------------------------------------------------------
|        ____ _ _   _   _       _          _        _   _                      |
|       / ___(_) |_| | | |_   _| |__      / \   ___| |_(_) ___  _ __  ___      |
|      | |  _| | __| |_| | | | | '_ \    / _ \ / __| __| |/ _ \| '_ \/ __|     |
|      | |_| | | |_|  _  | |_| | |_) |  / ___ \ (__| |_| | (_) | | | \__ \     |
|       \____|_|\__|_| |_|\__,_|_.__/  /_/   \_\___|\__|_|\___/|_| |_|___/     |
|                                                                              |
|                       Self-hosted runner registration                        |
|                                                                              |
--------------------------------------------------------------------------------

# Authentication


√ Connected to GitHub

# Runner Registration

Enter the name of the runner group to add this runner to: [press Enter for Default]

Enter the name of runner: [press Enter for localhost]

This runner will have the following labels: 'self-hosted', 'Linux', 'X64'
Enter any additional labels (ex. label-1,label-2): [press Enter to skip] prod

√ Runner successfully added
√ Runner connection is good

# Runner settings

Enter name of work folder: [press Enter for _work]

√ Settings Saved.
下面的說明會說可以使用 ./run.sh 直接執行,先確定可以執行成功。
deploy@localhost:~/actions-runner$ ./run.sh

√ Connected to GitHub

Current runner version: '2.306.0'
2023-07-25 03:00:58Z: Listening for Jobs
2023-07-25 03:00:34Z: Running job: deploy
再來我們會希望它是 Service 的方法啟動啟動的方法可以參考文件 Configuring the self-hosted runner application as a service,不過主要的步驟簡單如下:
安裝 Service
sudo ./svc.sh install
啟動 Service
sudo ./svc.sh start
都安裝成功後理論上就可以無痛使用 self-hosted runner 在自己內網裡面部署機器了。
修改 runs-on
要使用自己的 self-hosted 要修改 runs-on 把原本的 ubuntu-latest 修改成 self-hosted,如此就完成了。
roots/setup-trellis-cli@v1 執行 init 一直失敗
雖然理論上會成功,不過我的部署工具在安裝的時候一直安裝失敗,詳細 Log 如下
Initialize project
  Received 0 of 57572595 (0.0%), 0.0 MBs/sec
  Received 53378291 of 57572595 (92.7%), 1.8 MBs/sec
  Received 57572595 of 57572595 (100.0%), 1.9 MBs/sec
  Cache Size: ~55 MB (57572595 B)
  /usr/bin/tar --use-compress-program unzstd -xf /home/deploy/actions-runner/_work/_temp/a4a28fd4-2146-4c44-9a23-2d9b7176ac65/cache.tzst -P -C /home/deploy/actions-runner/_work/clarence/clarence
  Cache restored successfully
  Cache restored from key: Linux-trellis-venv-17636408a8ab59ff17b82d0596d617b82c80696c64b411eb683dd20c0a89e56a
  /home/deploy/actions-runner/_work/_tool/trellis-cli/1.11.0/x64/trellis init
  Initializing project...

  ⠋   Ensure pip is up to date
  [✓] Ensure pip is up to date
  ⠋   Installing dependencies (this can take a minute...)
  [✘] Error installing dependencies

Error: The process '/home/deploy/actions-runner/_work/_tool/trellis-cli/1.11.0/x64/trellis' failed with exit code 1
目前知道的問題是因為他在使用 /home/deploy/actions-runner/_work/_tool/trellis-cli/1.11.0/x64/trellis init 執行 init 的時候一直發生錯誤,所以我就到機器裡面的 /home/deploy/actions-runner/_work/clarence/clarence 目錄執行 init 發現也是一樣的錯誤
deploy@localhost:~/actions-runner/_work/clarence/clarence$ /home/deploy/actions-runner/_work/_tool/trellis-cli/1.11.0/x64/trellis init
Initializing project...

[✓] Ensure pip is up to date
[✘] Error installing dependencies
這時候我就使用 force 指令在測試一次,發現如果使用 force 的方法它會正常。
deploy@localhost:~/actions-runner/_work/clarence/clarence$ /home/deploy/actions-runner/_work/_tool/trellis-cli/1.11.0/x64/trellis init --force
Initializing project...

[✓] Deleting existing virtualenv
[✓] Created virtualenv (/home/deploy/actions-runner/_work/clarence/clarence/trellis/.trellis/virtualenv)
[✓] Ensure pip is up to date
⠇   Installing dependencies (this can take a minute...)

pip install taking longer than expected. Switching to verbose output:

Successfully installed MarkupSafe-2.1.3 PyYAML-6.0.1 ansible-8.2.0 ansible-core-2.15.2 cffi-1.15.1 cryptography-41.0.2 jinja2-3.1.2 packaging-23.1 passlib-1.7.4 pycparser-2.21 resolvelib-1.0.1
[✓] Dependencies installed
如此知道它其實是因為 cache 影響的,所以我就到 setup-trellis-cli 尋找關閉 cache 的方法,發現只要把 cache-virtualenv 關閉就可以了,所以修改一下腳本,如此再跑一次部署它就可以正常工作了。
# Placeholder `setup-trellis-cli` action for deploying Trellis sites

name: Deploy Production site

on:
  workflow_dispatch:
  push:
    branches: [master]

jobs:
  deploy:
    runs-on: [self-hosted, prod]

    steps:
    - uses: actions/checkout@v2
    - uses: shimataro/ssh-key-action@v2
      with:
        key: ${{ secrets.TRELLIS_DEPLOY_SSH_PRIVATE_KEY }}
        known_hosts: ${{ secrets.TRELLIS_DEPLOY_PROD_SSH_KNOWN_HOSTS }}
        if_key_exists: ignore
    - uses: webfactory/[email protected]
      with:
        ssh-private-key: ${{ secrets.TRELLIS_DEPLOY_SSH_PRIVATE_KEY }}
    - uses: roots/setup-trellis-cli@v1
      with:
        repo-token: ${{ secrets.GITHUB_TOKEN }}
        cache-virtualenv: false
        ansible-vault-password: ${{ secrets.ANSIBLE_VAULT_PASSWORD }}
    - name: Deploy
      run: trellis deploy production